Yellow Coconut Cake Brûlée with Baba Moça
Well, first of all I must say that today’s recipe changed during the testing process. Originally, I wanted to make the famous Portuguese Cocada Amarela, but it did not turn out as I had in mind. It is true that the result was good, but I was looking for another result (specifically this one). I decided to use the same ingredients, with the same quantities, but varying the elaboration process to achieve what I was looking for. The recipe that I leave you is a reinterpretation of its traditional recipe that, in addition, I have merged influences from other versions, particularly the Brazilian, to create my own version of the “Cocada Amarela”, which I have called Cocada Amarela Brûlée de Moça or Yellow Coconut Cake Brûlée with Baba Moça.
Cocada Amarela origin.
Cocada Amarela is a typical dessert of Portuguese origin, probably originating from the Algarve region, famous for its confectionery based on egg yolks and sugar, like many of Portugal’s traditional convent sweets. The name “amarela”, which in Portuguese means “yellow”, refers to the characteristic vibrant color of the dessert, which is due to the generous amount of egg yolks used in its preparation.
This type of sweets became popular in convents during the Middle Ages, when the nuns created desserts rich in yolks to take advantage of the egg whites, which were used in the clarification of Port wine. Thus was born the tradition of the doces conventuais, which combined sugar and yolks to give rise to numerous creations.
The traditional recipe for Cocada Amarela consists of a mixture of beaten egg yolks with sugar, coconut milk or grated coconut (an ingredient incorporated later due to Portuguese trade with its tropical colonies, such as Brazil). It is simmered, which gives it a smooth and creamy texture. As the Portuguese Empire expanded, this dessert was adapted in other countries, especially Brazil and some regions of Africa, where it adopted new influences and adjusted to local ingredients.

Expansion and versions of the famous Portuguese dessert.
As the Portuguese Empire expanded, this dessert was taken to different parts of the world, especially Brazil and some African countries, where it adopted new influences and adapted to local ingredients.
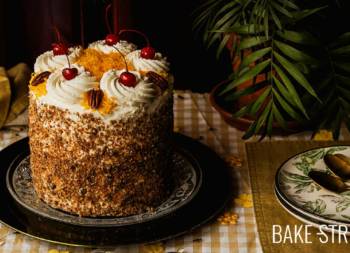
- Brazil: Cocada Amarela evolved in Brazil, a country that adopted and transformed many Portuguese sweets. There, it is known simply as Cocada, but is often distinguished by being creamier and less sweet than the dry cocadas that predominate in the region. It is usually prepared with condensed milk, which provides a denser texture, and Baba de Moça (I first left you with this recipe in the famous Martha Rocha Cake), a cream of egg yolks, sugar and coconut milk, became a frequent accompaniment to this dessert.
- Cocadas secas – Dry Cocada (Latin America): In Latin America, particularly in countries such as Mexico, Colombia, Venezuela and Cuba, the term “cocada” refers to a much drier coconut candy, often in the form of small balls or bars. These versions usually incorporate shredded coconut and sugar, without the predominant use of egg yolks as in Portuguese Cocada Amarela. In these regions, it is associated more with coconut than with eggs.
- Africa: In countries such as Angola and Mozambique, where the Portuguese influence is strong, Cocada Amarela has also been adapted with local ingredients. In Angola, the recipe includes coconut and egg yolks, but versions with added flavors, such as ginger or African spices, can be found.
Cocada Amarela has come a long way since its origins in Portuguese convents. Thanks to the influence of Portuguese trade and colonial expansion, it has been reinterpreted in various cultures, especially in Brazil and Africa, where coconut and tropical ingredients have given it a new interpretation.

My version, Yellow Coconut Cake Brûlée with Baba Moça.
I want to emphasize that my version is an interpretation that is not intended to compare, replace or detract from the traditional one. I have kept the name cocada, since the use of coconut in many elaborations is called that way and the word, amarela, because of the use of yolks and its final color. It is a variation on the traditional dessert, but with a completely different elaboration process.
To make it, instead of integrating and baking all the ingredients directly, I decided to use the same ingredients and quantities, but varying the elaboration process. I prepared a sponge cake of whipped yolks with dehydrated coconut (gluten-free), just like the technique used in the Capuchina Tart, but with the addition of coconut. Then, I made a syrup with coconut milk and soaked the cakes generously.

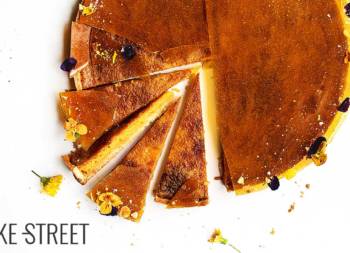
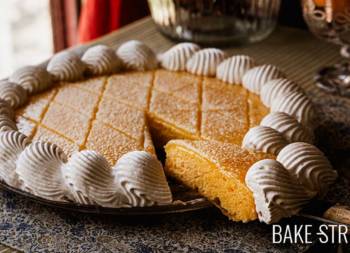
After resting for 24 hours, I unmolded the cake and covered the top with baba de moça, a Brazilian sweet made with egg yolks and coconut milk. To finish, I sprinkled demerara sugar on top and caramelized it with a blowtorch, creating a crème brûlée-like finish. When it was time to serve, I accompanied it with unsweetened Greek yogurt, crème fraîche or semi-whipped cream can be other options, decorated with Osmanthus flower and more baba de moça to taste.
I hope you enjoy this new version.
Recipe Yellow Coconut Cake Brûlée with Baba Moça
Ingredients for 5 units in a brioche mold of 10 cm diameter
YOLK COCONUT SPONGE CAKE:
- 210 g yolks (11 yolks, aprox.)
- 50 g dehydrated shredded coconut
COCONUT SYRUP:
- 100 g coconut milk
- 65 g water
- 200 g sugar
BABA DE MOÇA:
- 5 egg yolks, from large eggs (100 g aprox.)
- 100 g sugar
- 100 g water
- 100 g coconut milk
FOR DECORATING AND SERVE:
- dehydrated shredded coconut
- demerara sugar (for caramelization)
- Osmanthus flower (optional)
- unsweetened Greek yogurt, crème fraîche, semi whipped cream...
MATERIAL WE WILL NEED AND SHOWN IN THE VIDEO:
- KitchenAid mixer or stand mixer
- 5 brioche molds 10 cm in diameter or other non-stick baking pans
- bowls
- whisk
- saucepan
- digital kitchen thermometer
- digital kitchen scale
- cooling rack
- kitchen blowtorch
- pastry brush
- Margarita glasses (optional)
REMEMBER TO ENJOY SWEETS IN MODERATION. SUGAR SHOULD BE CONSUMED OCCASIONALLY AND NOT BE PART OF YOUR DAILY DIET TO MAINTAIN A HEALTHY LIFESTYLE.
Instructions
FIRST DAY
Prepare coconut yolk sponge cake.
- Preheat the oven to 300ºF/150ºC, heat up and down. Place a dish or tray, in the middle position of the racks, with boiling water inside, enough to cover the pan halfway. During the preheating time, some of the water will evaporate. I will tell you later how to proceed.
- Separate the egg whites from the yolks.
- In the bowl of the stand mixer add the yolks and whisk at medium-high speed until you obtain the ribbon point, letter point or “monter au ruban” in French. You must whisk the yolks until you obtain a voluminous mixture that falls evenly and continuously, like a ribbon or string. The process can take 10-15 minutes.
- While the yolks are whipping, prepare the molds.
- Grease brioche molds with olive oil, using a pastry brush to help grease the entire surface.
- Once the yolks are whipped, add the grated coconut and mix with a mix using gentle, encircling movements. It is important to be careful in this process to avoid breaking the air bubbles in the yolk mixture. Otherwise, they would drop and the final result would not be as airy and fluffy.
- Divide the dough into the molds, depending on the size, more or less dough will come out. In case of using the measure I detail, 5 biscuits will come out.
- Bake placing the mold inside the pan with water. If you notice that the amount of water has reduced too much, add boiling water until it reaches about, more or less, half of the molds.
- Bake for 28 minutes. Before taking it out of the oven, check that it is baked by poking a toothpick in the center of each sponge cake. The toothpick should come out clean.
- Remove from the oven and place the molds on a wire rack.
While the cake is baking, prepare the syrup.
- Add the water along with coconut milk and sugar to a saucepan. Place over medium heat and bring to a boil. The sugar should be completely dissolved.
- Once it comes to a boil, reduce to medium low heat, cook for 5 minutes and turn off the heat.
- Reserve until ready to use.
Once the cakes are baked, pour the syrup.
- As soon as you take the cakes out of the oven and place it on a rack, still hot, prick the entire surface with a toothpick.
- Spread all the syrup carefully over the surface of the sponge cakes. You must soak them very well and use the entire amount of syrup. If you notice that the syrup remains on the edge of the mold, with the help of a toothpick gently move the cake so that the syrup falls to the bottom and is absorbed by it.
- Let cool at room temperature and inside the molds.
- Once cooled, cover with plastic wrap and let stand for 24 hours in the refrigerator.
- NOTE: During the resting time, the sponge cakes will absorb all the syrup resulting in a very moist bite.
Baba de moça.
- In a saucepan, add the sugar and water. Cook over medium heat, without stirring, until it reaches 244ºF/118ºC.
- Turn off the heat and leave to stand for 5 minutes.
- While the syrup is resting, pass the egg yolks through a sieve to remove any impurities. Set aside.
- Once the resting time has elapsed, add the coconut milk to the syrup and whisk with a whisk to homogenise.
- Pour, in a continuous stream, the syrup and coconut milk mixture over the egg yolks while whisking at the same time. This will temper the egg yolks, preventing them from curdling into a lumpy cream.
- Once all the syrup is integrated, transfer the mixture to the saucepan and cook over medium-low heat, stirring constantly, until thickened. This time, we will not thicken as much as we did for Martha Rocha Cake. This process can take between 8-10 minutes.
- Transfer the cream to a bowl and cover with cling film (touching the surface of the cream). This will prevent the surface from drying out and forming a crust.
SECOND DAY
Unmold and cover with baba de moça cream.
- With the help of a toothpick, gently separate the cake to allow air to enter. Carefully turn and unmold.
- Cover the entire surface of each cake with a generous layer of baba de moça.
- Sprinkle the surface with demerara sugar and use the blowtorch to caramelize the sugar. This will give you a finish reminiscent of crème brûlée.
- Cover the base and bottom edge with shredded coconut.
Serve.
- In my case I have decided to use Margarita glasses, but you can present them in bowls or plates.
- Fill the base of the mold with unsweetened Greek yogurt. If you prefer, you can use crème frâiche or semi whipped cream with very little sugar instead. Each Margarita glass requires about 90 g of yogurt.
- Place the sponge cake on top of the yogurt and sprinkle with a few Osmanthus flowers (these can be omitted if desired). Serve with the remaining baba de moça so that each person can help themselves to taste.


Notes
- To prepare the molds, you must grease the base and sides with olive oil. It is very important that they are non-stick, otherwise it is very possible that the cake will stick and break when unmolded.
- In my case I have used brioche molds of 10 cm in diameter, but you can use other molds of similar characteristics or any other mold you prefer, always adjusting the baking time.
- To make the cake you only need egg yolk and grated coconut, no corn starch, flour, sugar.... It will be enough to whip the yolks in the way I show you and specify. The process is the same that we follow to make the famous Capuchina Cake.
- It is very important to bake the cakes in a bain-marie to favor its perfect texture and tenderness. The size of the mold will always determine the final baking time.
- The sponge cakes must rest with the syrup for 24 hours. During this time it will absorb all the syrup, achieving a wonderful texture and moistness.
- The syrup is made with coconut milk, it provides a wonderful and interesting aroma.
- The coconut yolk cream, baba moça, is very similar in appearance to yolk pastry cream. It is important that you follow the detailed process to achieve a good result and get a silky smooth cream, not lumpy or clotted looking.
- Baba de moçahas a very simple process of elaboration, but it requires care and patience when you are cooking it. Do not stop stirring the cream constantly to prevent lumps from forming or to prevent part of the cream from sticking to the base and starting to burn, as this would spoil the final texture and flavor. Maintain a medium low temperature during the whole process.
- With the surplus egg whites you can prepare a Portuguese egg white pudding, Molotof, macarons, dry meringues...
- To serve them you can accompany them with the options I leave you, in my case I opted for Greek yogurt without sugar. It is important that the accompaniment has no sugar or very little, the cake is sweet and the baba de moça, too.
- Keep in mind that if you caramelize the baba de moça cream, it will only stay crunchy for a few hours. This step should not be done a day in advance, because the caramel will lose its crunchy touch.
- The osmanthus flowers bring a fruity and sweet flavor, reminiscent of peach and apricot. They can be eaten.
- Once finished and refrigerated, they can be kept for 2-3 days more, always refrigerated.


If you want to surprise with an easy, simple and absolutely spectacular dessert, you can't miss this Yellow Coconut Cake Brûlée with Baba Moça.
It does not require complicated elaboration processes, its ingredients are inexpensive and accessible and, most importantly, it can be made in advance. In fact, it should be made this way because it needs to rest in the refrigerator.
It is ideal to have everything ready and assemble before serving. The result is magnificent in flavor, texture and aromas. Not to mention that it is suitable for celiacs because it does not require any type of flour in the process. Sincerely, it seems to me a ten dessert for Christmas.
If you have space in the fridge, you can even leave it fully assembled with the Greek yogurt base and caramelized surface. That is, take it out of the fridge, serve it and you'll be like kings.
By the way, I remind you that you can watch all my videos on my YouTube channel. If you subscribe and turn on the little bell, I will be eternally grateful!
I wish you a lovely Sunday!
Lots of love,
Eva