The recipe I bring you today has a very summery and fresh look, ideal for this time of the year. This cake is a version and adaptation, inspired by the classic dessert of French origin, Pêche Melba Cake.
For those who do not know this dessert, also known as Peach Melba, it is a combination of peach with vanilla ice cream and raspberry syrup or coulis. Sometimes you can even sprinkle toasted almond slices on the surface.
Origin and history of the Pêche Melba dessert.
This dessert was created by the famous French chef Auguste Escoffier at the end of the 19th century in honor of the Australian soprano Nellie Melba, whose real name was Helen Porter Mitchell.
Nellie Melba was one of the most famous opera singers of her time, she has gone down in history not only for her mastery as a prima donna, but also for being the image of the $100 bill of her native land. In addition to having been the inspiration for one of those desserts that ended up becoming a culinary classic; the Pêche Melba.

It was after one of his numerous European performances, when the French chef Auguste Escoffier, one of his most fervent admirers and close friend, created a dessert in his honor which he called Pêche Melba.
The first version of the dessert was prepared in 1892 or 1893, when Nellie Melba was in London singing at Covent Garden for a performance of the play Lohengrin. Escoffier, who worked at the famous Savoy Hotel, created the dessert for a banquet in her honor.
Presenting dessert.
The dessert was originally presented in an ice sculpture depicting a swan, which is an element of the opera Lohengrin, in which Nellie Melba performed. The dessert consisted of fresh peaches over vanilla ice cream with a raspberry sauce poured on top.
Pêche Melba remains a popular and elegant dessert, representing a legacy of the great French culinary tradition. Its creation is a testament to the friendship and admiration between Escoffier and Nellie Melba, and the dessert has endured as a classic thanks to its simplicity and exquisite taste.
Pêche Melba Cake inspired by the classic dessert.
With the arrival of summer, I thought it would be a wonderful idea to adapt this refreshing and elegant dessert to the tart format. Although I have allowed myself to have certain liberties when it comes to carrying it out and presenting it.
The sponge cake is a recipe that I have left you in more than one occasion, but I consider that it has a fascinating result and has become “my ideal and perfect cake for tarts“. I recently left it for Tocino de Cielo Cake and, some time ago, for this amazing Fruit Cake.
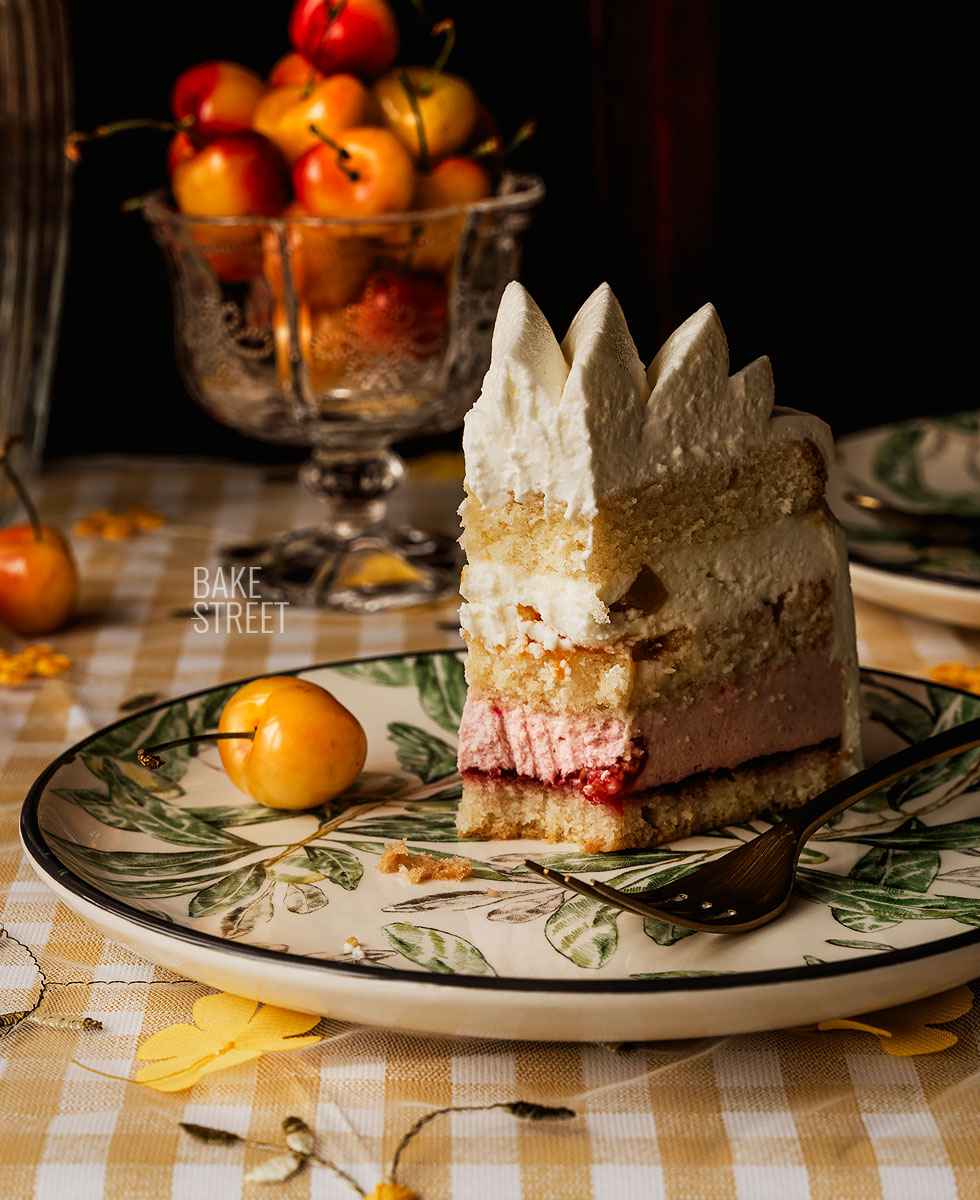
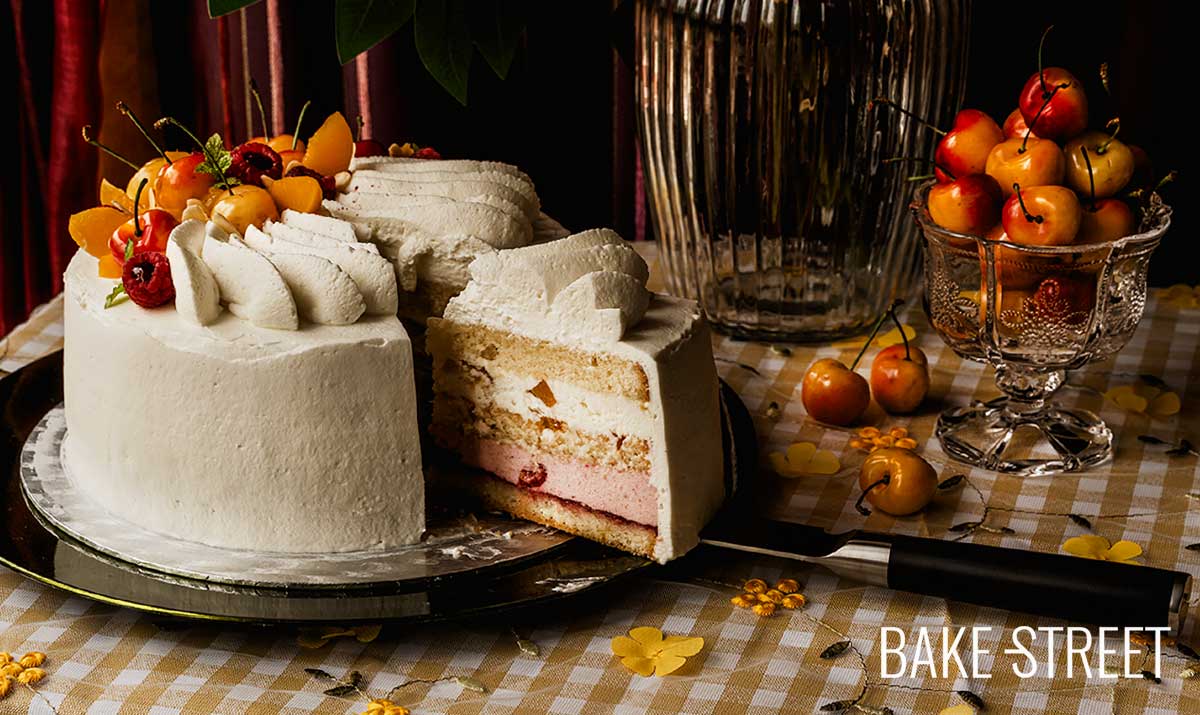
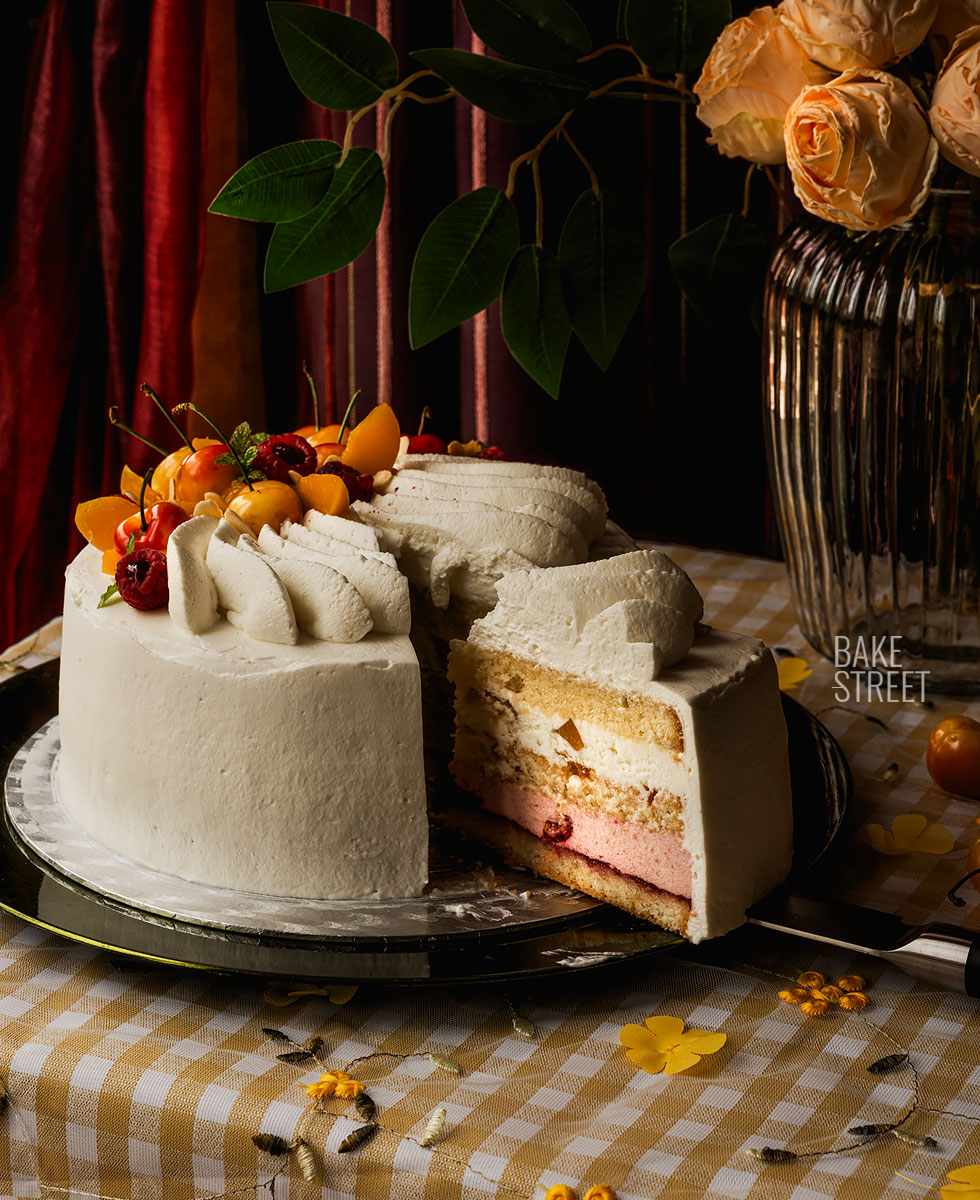
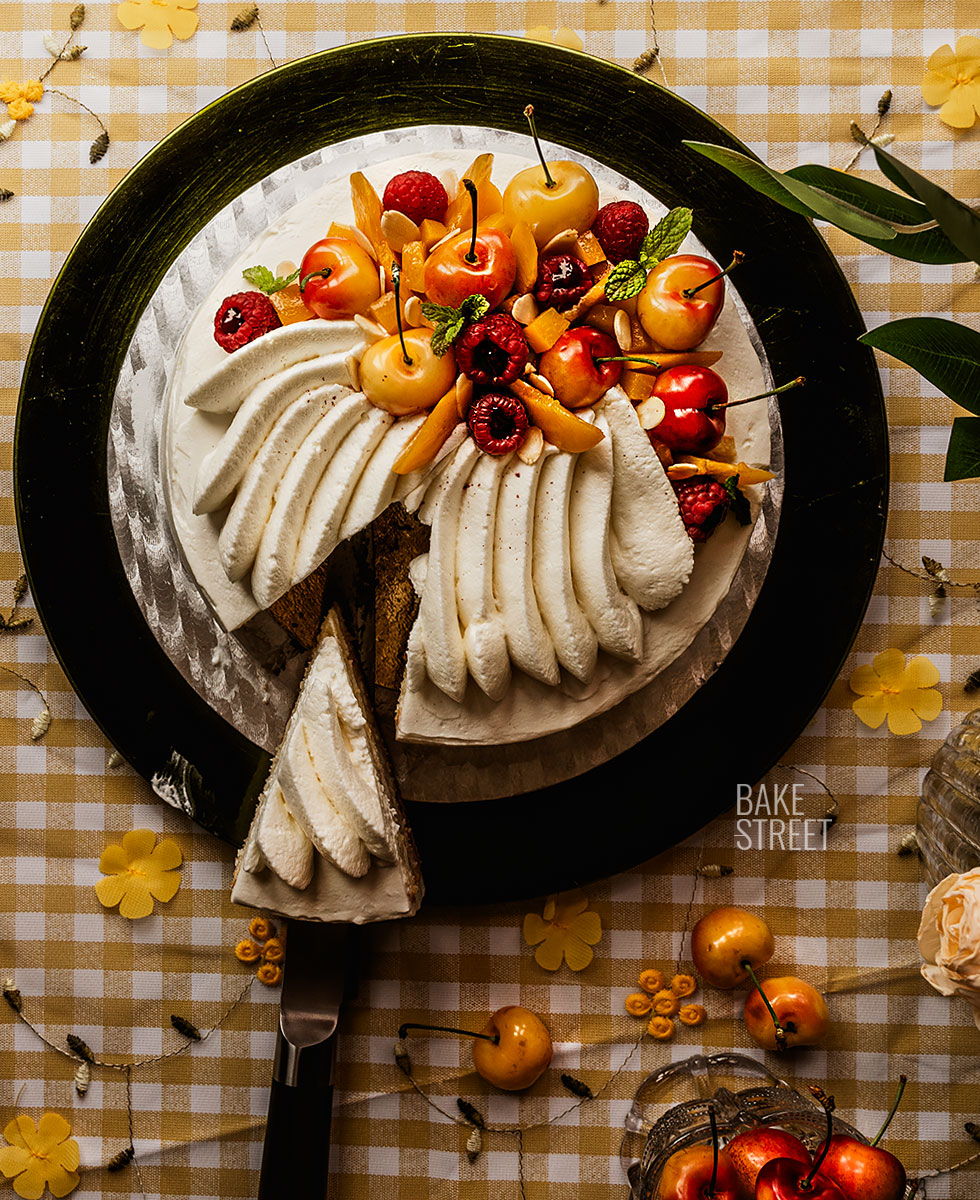
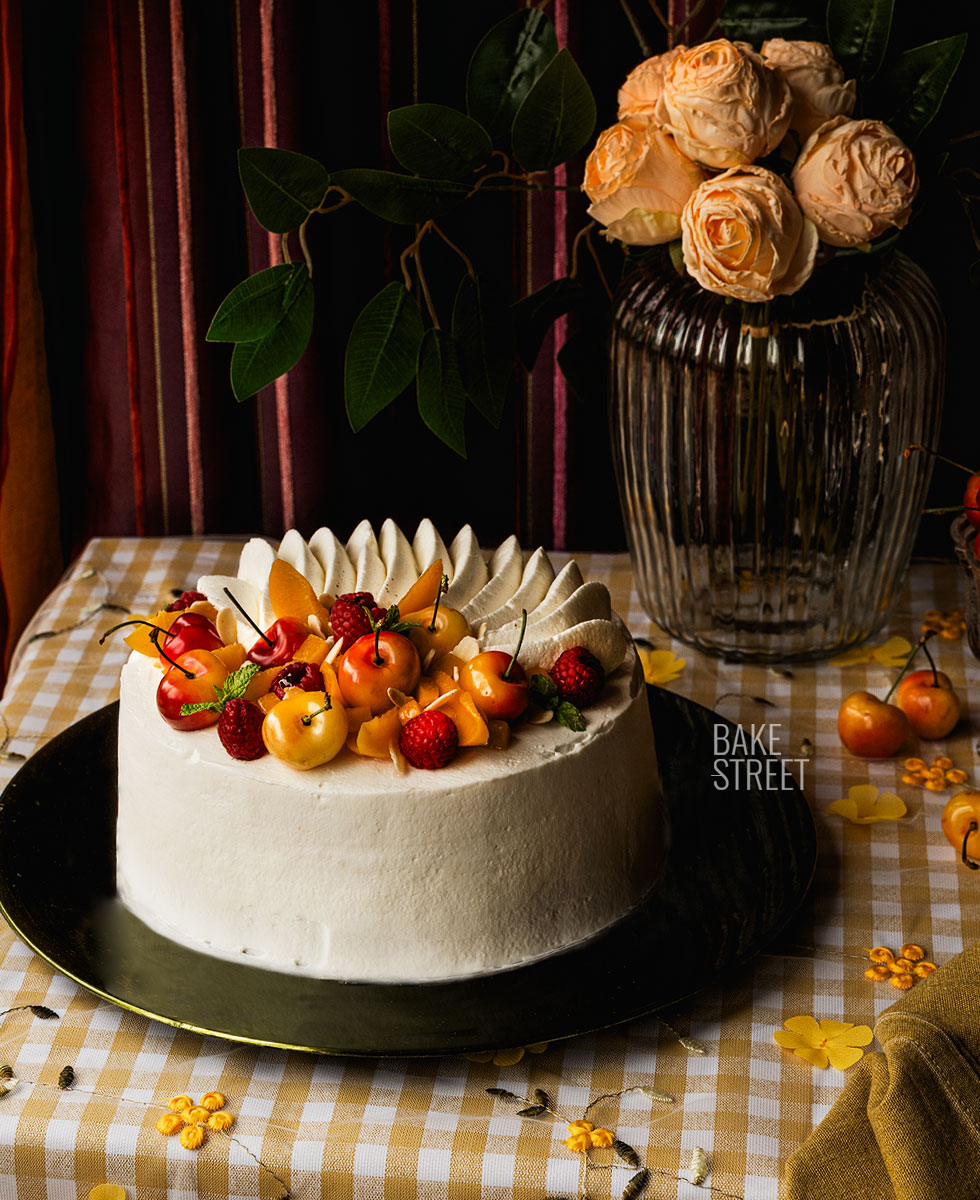
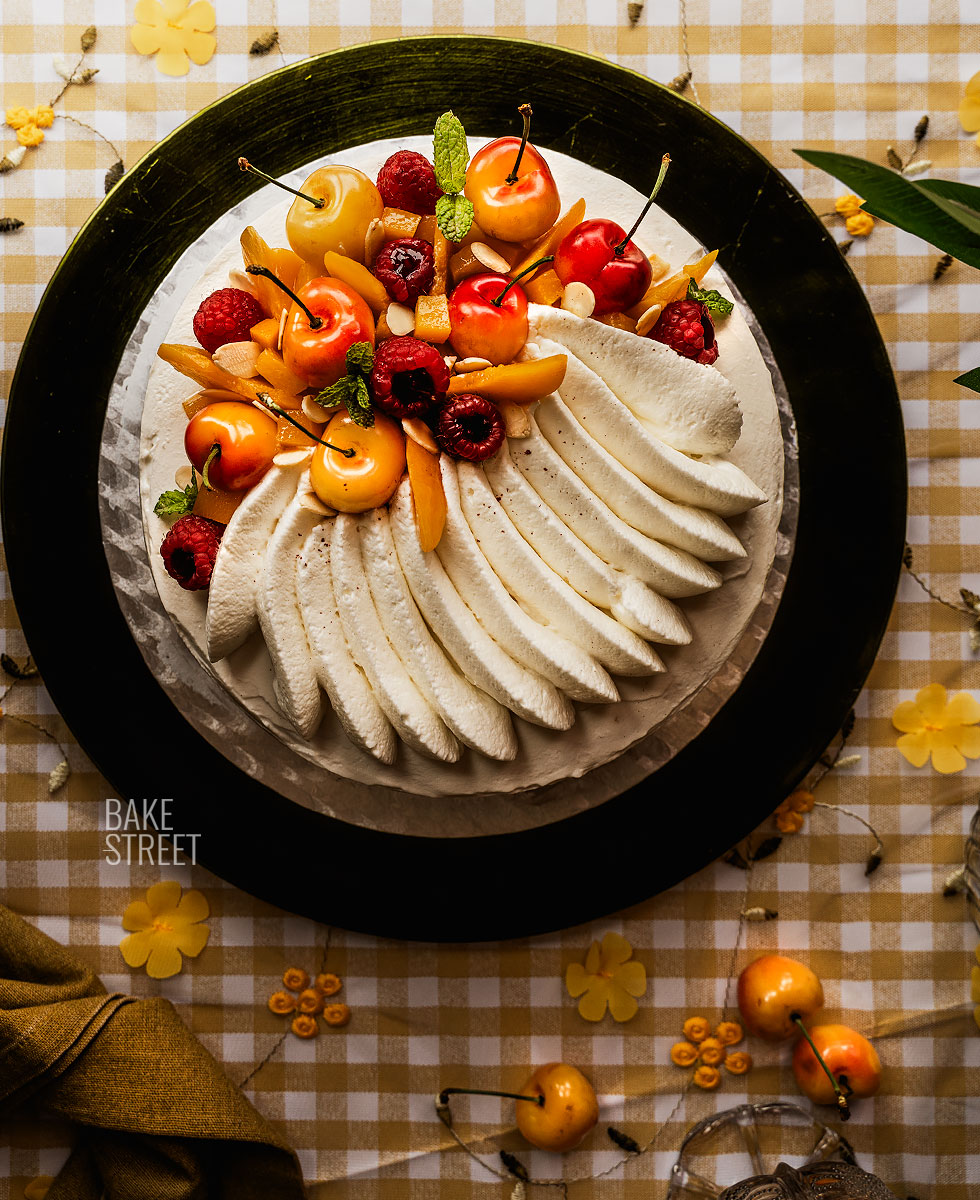
The tart is composed of a raspberry mousse with fresh raspberries and a thin layer of raspberry jam on the base, along with another layer of mascarpone, cream and vanilla with peach in syrup and also accompanied by a thin layer of peach jam.
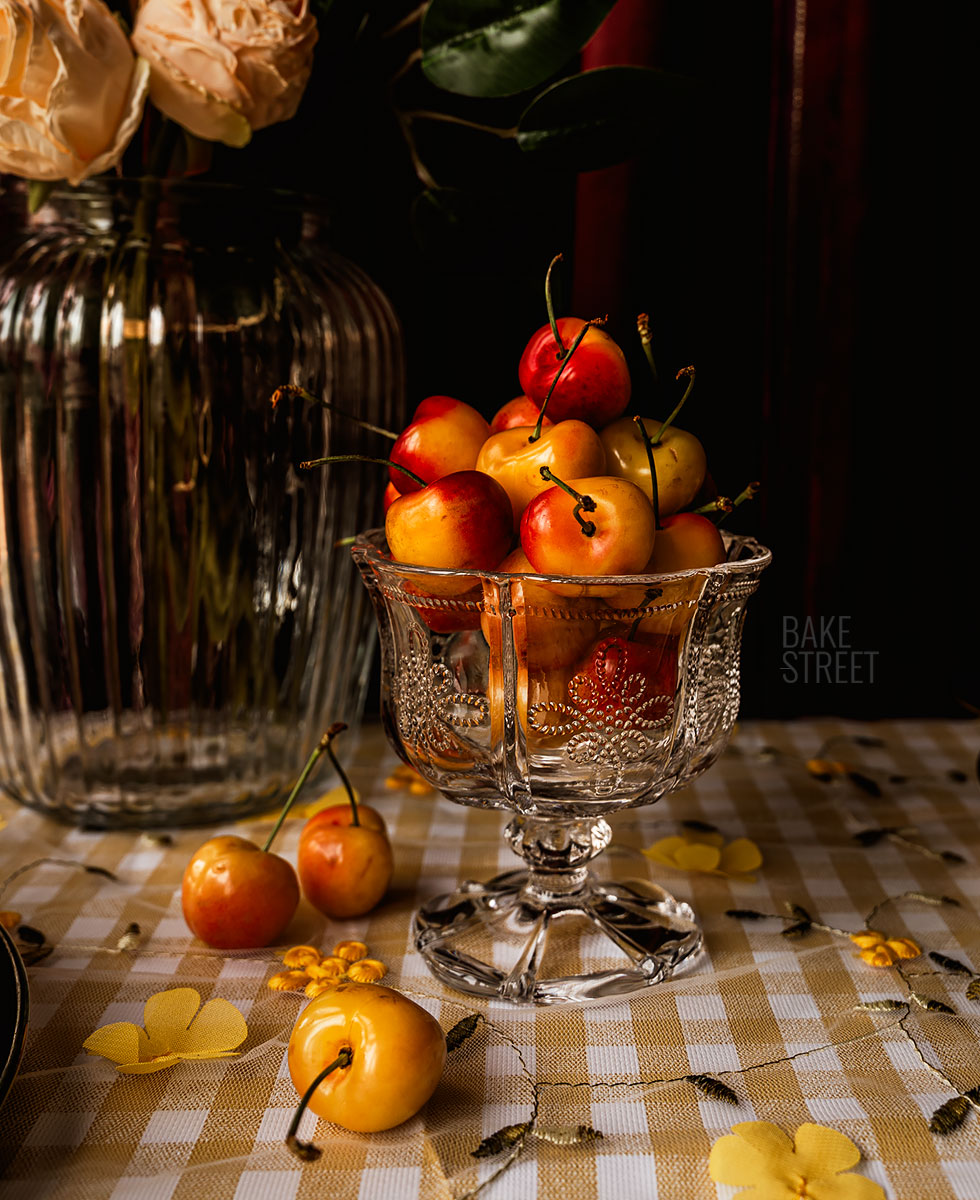
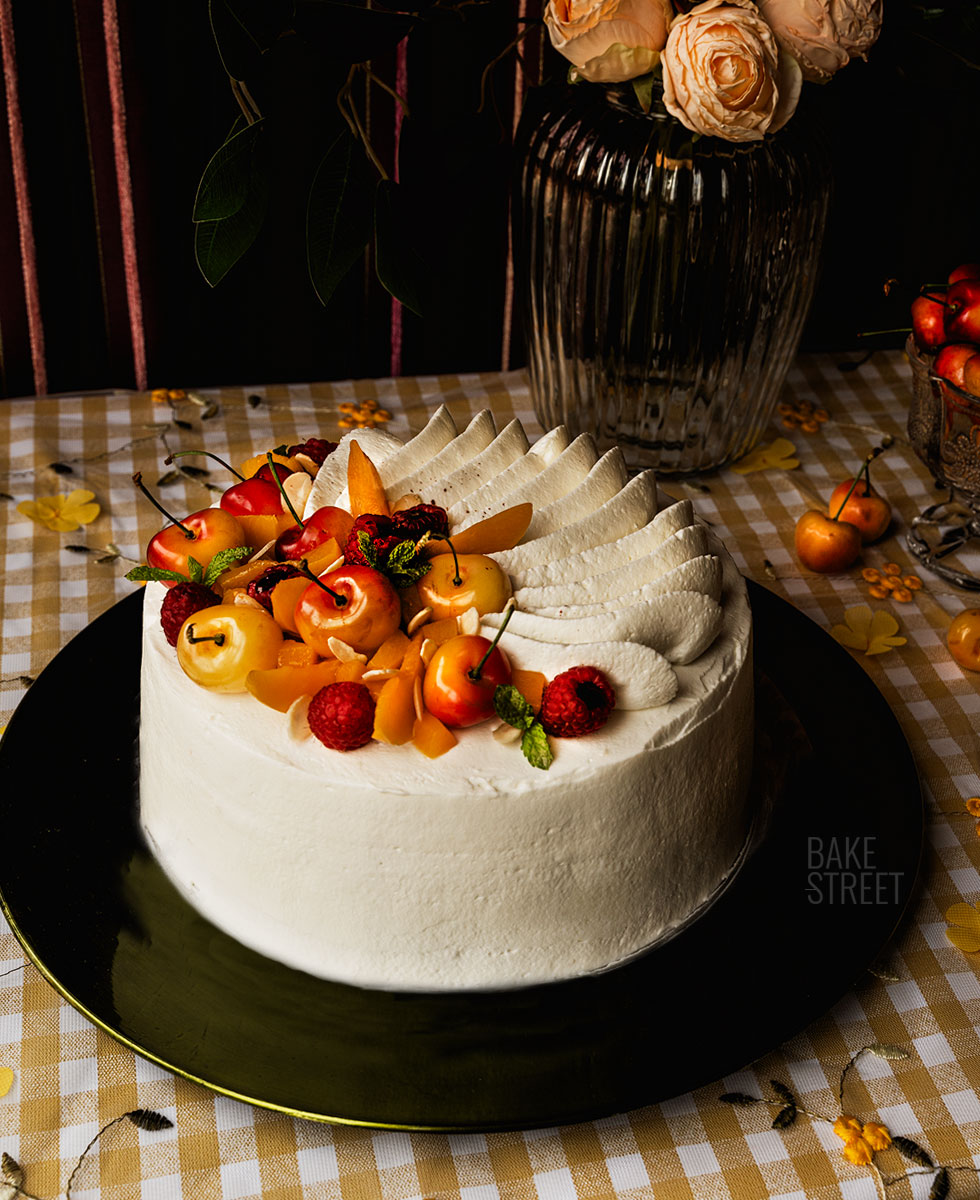
Decoration is carried out with whipped cream and fruits; fresh raspberries, peaches in syrup and Rainier cherries. The latter are an addition that is not part of the original dessert, but I consider that it adds an elegant touch visually, as well as freshness and natural sweetness. Not to mention that it combines the colors of the two main fruits; yellow and red. Finally, it is decorated with toasted sliced almonds and some fresh mint leaves.
Rainier cherries are a sweet cherry variety known for their exceptional flavor and distinctive yellow color with a red blush. They were developed in 1952 by Harold Fogle at Washington State University as a cross between Bing and Van varieties.
The result is an extraordinary cake. Fresh, sweet, soft, delicate… I think you will fall in love with it.

Recipe Pêche Melba Cake
Ingredients for 20 cm de diameter mold SPONGE CAKE:- 4 large eggs, whites and yolks separate
- 20 g water, room temperature
- 140 g sugar, separated in two equal parts (70 g + 70 g)
- 120 g cake flour
- 60 g cornstarch
- 4 g baking powder
- zest of one lemon
- pinch of salt
- 200 g water
- 160 g sugar
- 150 g raspberry jam + 15 g water
- 5,5 g gelatin (sheets or powder) Italian meringue: 25 g white + 37 g sugar + 13 g water
- 160 g whipping cream, cold + 9 g powdered sugar
- 8-10 raspberries, cut in halves
- for the base of the mousse: 110 g raspberry jam
- 165 g whipping cream, cold + 165 g mascarpone cheese,cold + 45 g powdered sugar + 1 teaspoon vanilla extract
- peach in syrup cut into small pieces (1 or 2 halves)
- for the cream base: 110 g peach jam without chunks
- 600 g whipping cream, cold + 45 g powdered sugar.
- Rainier cherries
- raspberries, fresh
- peach in syrup
- mint leaves
- toasted flaked almonds
- ruby powder (edible ruby-colored metallic powder coloring) for sprinkling, optional
- KitchenAid mixer or stand mixer
- round mold 20 cm diameter, removable
- acetate strips + adhesive tape
- cake base 20 cm
- cake cutter or serrated knife
- rotating cake stand
- bowls
- whisk
- pastry spatula
- digital kitchen scale
- digital kitchen thermometer
- grater
- cooling rack
- pastry brush
- precision tweezers (optional)
- piping bag + Saint Honoré 18 mm nozzle
Instructions
FIRST DAYPrepare sponge cake.
- In the bowl of the KitchenAid, add the egg yolks, water and 70 g of sugar. Beat with the whisk at medium-high speed until a whitish color and a creamy texture is achieved, you will notice that it gains some volume.
- Begin to incorporate the flour, little by little. Integrate while mixing on speed 1.
- Add the baking powder along with the salt, mix.
- Once everything is combined, set aside.
Whip the meringue.
- In another bowl, add the egg whites and begin to whip. Once it begins to froth, add the sugar (the remaining 70 g).
- Whip with the whisk at medium-high speed until you have a semi-whipped meringue. At this point, add the cornstarch, in two batches.
- Add half of the cornstarch and beat until incorporated. Add the rest of the starch and whip the egg whites to stiff peaks.
Fold the meringue into the egg yolk mixture.
- Start incorporating the meringue, little by little, into the egg yolk mixture.
- Add a small amount, mix with a spatula until fully integrated and continue adding more. The first part of meringue will help smooth the mixture. As you add more, the mixture will become smoother and lighter.
- When adding the last batch of meringue, add the lemon zest along with the meringue and mix with the whisk using gentle, encircling movements to integrate it.
Pour in the mold and bake.
- Preheat the oven to 356ºF/180ºC, heat up and down.
- Grease and line a 23 cm diameter baking pan with baking paper.
- Pour the mixture into the mold and tap gently to settle the mixture.
- Bake for 25 minutes.
- Remove from the oven, let stand for 5 minutes in the pan and remove from the mold. Place on a cooling rack, upside down to make the dome as smooth as possible, and let cool almost completely.
- Wrap the sponge cake in plastic wrap when warm and let it cool completely. Refrigerate until the next day.
- NOTE: Wrapping the sponge cake in film, warm to cold, helps the cake to remain very moist and tender. Refrigerating the cake makes the cutting process much easier.
Prepare syrup.
- Add the water and sugar to a saucepan. Place over medium heat and bring to the boil. The sugar should be completely dissolved.
- Once it comes to the boil, reduce to medium heat, cook for 5 minutes and turn off the heat.
- Allow to cool completely.
Cut the sponge cake.
- Cut the cake into three equal parts with the help of a cake cutter.
- In my case, I get 4 pasts, one of them thinner.
- Set aside wrapped in cling film to prevent it from drying out.
Prepare the mold with the first layer of sponge cake.
- Place a non-skid together with a cake base inside a 20 cm diameter springform pan. Line the sides with a sheet of acetate, it will help to hold the cake in a perfect shape. Fasten the two ends of the acetate sheet with some adhesive tape.
- Spread a small amount of whipped cream or jam on the cake disk and place the first sponge cake on top.
- Soak well with the syrup.
- Spread a layer of raspberry jam over the sponge cake, smoothing it out to make sure it is smooth and even.
- Cover with cling film over the acetate to prevent it from drying out.
Whip the mascarpone cream to fill the cake.
- The cream and mascarpone cheese must be at least 24 hours in the cold.
- The bowl in which the cream is whipped must be cold.
- Pour the cream along with mascarpone cheese into the chilled bowl with the powdered sugar. Whip with the whisk at medium speed.
- Increase the speed gradually, but never reach maximum speed. The ideal is a medium-high speed. Be careful not to overbeat it or it will be cut and you will get butter...
- Add vanilla extract in the last seconds of whipping.
- Set aside in the refrigerator until ready to use.
Prepare raspberry mousse.
- Hydrate the gelatin in very cold water for 20 minutes. You can advance this step while preparing the mold with the first layer of sponge cake.
- Pass the raspberry jam through a sieve to remove the seeds.
- Heat the raspberry jam together with the 15 g of water until it reaches 113º-118ºF/45º-48ºC.
- Stir in the gelatin, well drained, and mix with a whisk or spoon until fully integrated. Set aside.
- Prepare an Italian meringue. In a saucepan add 13 g of water and 37 g of sugar.
- Cook over medium heat until it reaches 244ºF/118ºC.
- Meanwhile, semi whip the 25 g of egg whites.
- Once the syrup is ready, pour over the semi whipped egg whites in a thin, continuous thread while mixing at the lowest speed.
- Once you have incorporated all the syrup, gradually increase the speed without reaching maximum speed. You should obtain a soft peaks meringue. Set aside.
- Whip the 160 g of cream with 9 g of powdered sugar.
- Pour the raspberry jam into a large bowl. Add the whipped cream and Italian meringue alternately, waiting to incorporate completely before adding more.
- To integrate both the whipped cream and the meringue, you can use a silicone spatula or a whisk. In my case I prefer the second option.
- Do it with smooth movements, not beating or mixing vigorously.
Fill the mold with the raspberry mousse.
- With the help of a ladle, add the raspberry mousse inside the cake pan lined with the sponge cake. Smooth to a uniform thickness.
- Place raspberries cut in half all over the surface of the mousse. Make sure they do not remain on the surface, but are slightly sunken.
- Once placed, smooth the surface.
- Place the second disc of sponge cake on the mousse and adjust well to avoid air or holes.
- Brush generously with the syrup.
Place the mascarpone cream and peach filling.
- Spread a layer of peach jam without pieces on the second sponge cake, smooth to make it smooth and even.
- Fill with the mascarpone whipped cream that you had reserved in the refrigerator. Smooth to achieve a uniform thickness.
- Place pieces of peaches in syrup, not too large so that they do not disturb when cutting the tart portions, all over the surface of the cream. Make sure they do not remain on the surface, but are slightly sunken.
- Once placed, smooth the surface.
- Place the last sponge cake, adjust carefully.
- Brush generously with the syrup.
- Cover with plastic wrap and let stand in the refrigerator until the next day.
Whip the cream to cover and decorate the cake.
- The cream and mascarpone cheese must be at least 24 hours in the cold.
- The bowl in which the cream is whipped must be cold.
- Pour the cream into the chilled bowl with the powdered sugar. Whip with the whisk at medium speed.
- Increase the speed gradually, but never reach maximum speed. The ideal is a medium-high speed. Be careful not to overbeat it or it will be cut and you will get butter...
- Set aside in the refrigerator until ready to use.
Decorate the cake.
- Unmold the cake, carefully remove it from the mold and remove the acetate. Gently peel it off to prevent any filling from sticking to it and leaving holes.
- Cover the outside of the cake with a layer of whipped cream. Smooth the surface with the help of a cake smoother.
- Place the remaining whipped cream in a piping bag with an 18 mm Saint Honoré nozzle.
- Pipe the whipped cream on the top of the cake as shown in the video. If you wish, you can carry out another type of decoration.
- Finally, decorate with the fruit, toasted flaked almonds, mint leaves and, if you wish, you can sprinkle a little ruby powder on the whipped cream.
Notes
- To make this cake you need a 20 cm diameter mold, removable.
- The acetate helps the cake to keep its perfect shape and, if liquid or moist ingredients are used (not on this occasion), to stay in place. It also favors a perfect unmolding.
- The sponge cake is extremely tender. So much so that if you want to cut it the same day you bake it, you must have a good cake cutter or a very good hand with a serrated knife. The sponge cake is so tender that it shrinks when you push it with the cake cutter, for that reason the rest favors that this step is carried out more easily.
- You can flavor the syrup with a liqueur if you wish, for example peach liqueur. Or if you prefer a non-alcoholic option, a little vanilla will go very well.
- When whipping the cream, remember that it must be very cold to whip well. Also be careful when whipping it so as not to over whip it and spoil it. Whenever you do not use it, keep it refrigerated so that it does not lose its firmness.
- If you prefer to prepare a raspberry puree instead of using jam, you need 200 g raspberries + 25 g sugar. To see how to proceed, you can do it in this post where I show you how to make a strawberry mousse with natural strawberry puree. Only this time, replace these with raspberries.
- The decoration is optional, you can do it as I show you or another of your choice.

- I used the Saint Honoré 18 mm nozzle, but you can vary the decoration of the gusset and use another nozzle you have at home.
- The cherry is not a fruit that is part of the Pêche Melba dessert, but I thought that having both colors of the main fruits, raspberries and peaches, it would be a perfect companion for the decoration of the cake. In case you can't find it, you can use red cherries.
- The cake, once assembled, can be kept refrigerated for 3-4 days.