Martha Rocha Cake
I must admit that what caught my attention the most about the cake I’m bringing you today was the spun egg decoration…. Could it be anything more retro or vintage with that element? Impossible! And, of course, as I am a born compiler of peculiar and different recipes, I knew I had to bring you this gem of Brazilian gastronomy, Martha Rocha Cake.
In my house, my mother has always bought spun egg at Christmas to decorate smoked salmon or white asparagus dishes. Of course with her cherry tomatoes and lamb’s lettuce sprouts (my taste for old-fashioned things runs in my family…). But I’d never seen a sweet where it was used, let alone as a decoration. It really made my eyes twinkle.
The thing is that I started to investigate more about it and I found a little bit of everything… Some recipes didn’t work, due to quantities, ingredients and measurements. And others were a bit strange to follow or lacked many steps that I consider important. They were.
As an anecdote, I have prepared this cake twice, having already developed the recipe (until I had developed it, I had to repeat some preparations in which I should have followed my instinct and knowledge up to this point, but I trusted myself).
The first one, which should have been the only and definitive one, and the second one that I had to do because when I dumped the videos, I had to do something strange and I lost/erased all the videos of the assembly of the cake. When I realised… it almost gave me a heart attack. Especially because I had already overwritten the video card with two new recipes. I guarantee you that this recipe is more than tested, we’ll keep that part, which is the good part. Together with the fact that at home we have been eating delicious cake for several days.

Origin and history of the Martha Rocha Cake.
The Martha Rocha Cake is one of the most famous cakes in the south and southeast region of Brazil, inspired by a woman who gave her name to this gastronomic jewel.
At the age of 18, María Martha Hacker Rocha participated in the Miss Bahia contest where she won and, shortly after, became Miss Brazil. In July 1954, Martha arrived in the United States and the polls already considered her to be Miss Universe. Martha came in second place and legend has it that losing the Miss Universe title to American Miriam Stevenson was due to two extra centimetres on her hips.
However, it is said that the story of those two centimetres was an invention of the journalist João Martins, from the magazine ‘O Cruzeiro’, to console the Brazilians who had high expectations of her winning the title.
Martha Rocha was a woman with very attractive features, a fair complexion, blue eyes and curly hair. It was Dona Dair, a pastry chef from Curitiba, who was inspired by her image to create one of the greatest gastronomic successes of Brazilian pastry-making: the Martha Rocha Cake.
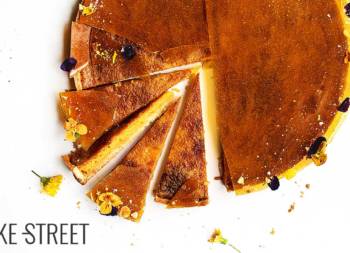
This cake is made up of several layers of filling; vanilla and chocolate sponge cake, egg yolk cream (baba de moça), nut brittle, apricot or plum cream, and a topping of whipped cream and spun egg.
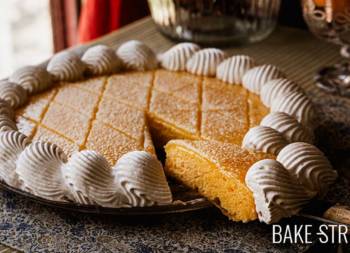
But among these layers there is one that has a special meaning: a meringue disc that gives the cake more height than other cakes. This meringue disc represents the extra two centimetres that Miss Brazil did not win the Miss Universe pageant in the USA that year. This detail fascinated me!

History about baba moça.
Baba de Moça is a sweet of Portuguese origin. In Portugal, it is known as ‘Ovos Moles de Aveiro’, and its traditional recipe includes only egg yolks and sugar syrup for the filling, and the resulting paste is wrapped in rice paper. It was when it arrived in Brazil that coconut milk was added, transforming it into ‘Baba de Moça’, Princess Isabel’s favourite sweet.
An interesting fact is that Portuguese sweets use a large amount of egg yolks. This is because, at that time, the nuns used the egg whites to starch their habits. The remaining yolks were used to make sweets, which explains why many Portuguese pastry recipes use a lot of egg yolks.
It can remind us a lot of the yolk pastry cream that I have left you in other occasions.
Spun egg origin.
The spun egg, curiously and surprisingly for me because I didn’t know about it, is another sweet of Portuguese origin, although its roots go back to the Byzantine Empire, where it was used to make ‘monk’s beards’. It was a round sponge cake, filled with fruit, syrup and decorated with spun egg on top.
However, its emergence and popularisation are attributed to Portuguese convents in the 15th century. Since then, it has been deeply linked to Portuguese gastronomy.
The process of making the spun egg consists of pouring the yolks through a special thin funnel, known as a ‘hilador’, into hot syrup, forming fine threads which are then collected and immersed in cold water to stop the cooking process. This method of preparation gives the spun egg its characteristic delicate texture and sweet, delicate taste.

Spun eggs are not only popular in Portugal.
It has also been integrated into the gastronomy of several countries, especially in Brazil, where it is commonly found as an accompaniment to festive dishes and as a garnish on cakes and desserts. Its versatility and aesthetics have made it a prized element in confectionery and haute cuisine.
In Spain, the spun egg was a typical pastry product. In fact, Francisco Martínez Montiño, cook to the Spanish Royal Household, wrote an interesting cookbook in which the recipe for the spun egg was already included. These golden threads of egg yolk, with an unmistakable flavour that complements satisfactorily with meat, fish, salads, starters and desserts, are highly appreciated not only for their flavour but also for their aesthetic beauty. They were considered a real delicacy.
The combination of history, tradition and culinary creativity makes both the Baba de Moça and the spun egg outstanding examples of the rich Portuguese gastronomic heritage, appreciated in different cultures and adapted to different palates around the world. Not to mention its expansion to other countries such as Brazil, where it is used to prepare wonders such as this exquisite cake.
Recipe Martha Rocha Cake
I based the cake on these two recipes, with some modifications; this and this
VANILLA SPONGE CAKES:
- 4 large eggs
- 120 g sugar
- 140 g cake flour, sifted
- 1 tsp vanilla extract
CHOCOLATE SPONGE CAKE:
- 2 large eggs
- 60 g sugar
- 60 g cake flour, sifted
- 10 g unsweetened cocoa powder, sifted
MERINGUE DISC:
- 100 g white eggs
- 180 g sugar
SYRUP:
- 160 g sugar
- 200 g water
- 1 spice clove
APRICOT PASTE:
- 150 g dried apricots + unmeasured boiling water (for softening)
- 30 g sugar
BABA DE MOÇA:
- 5 egg yolks, from large eggs (100 g aprox.)
- 100 g sugar
- 100 g water
- 100 g coconut milk
PECAN BRITTLE:
- 100 g pecans
- 150 g sugar
WHIPPED CREAM FOR FILLING:
- 300 g whipping cream, very cold
- 45 g powdered sugar
SPUN EGG:
I followed the steps of this recipe, the best I could find, modifying the quantities
- 500 g sugar
- 375 g water
- 6 egg yolks, from large eggs
MASCARPONE CREAM FOR DECORATION:
- 400 g whipping cream, very cold
- 250 g mascarpone cheese, cold
- 80 g powdered sugar
DECORATION:
- pecans
- Maraschino cherries (in this recipe you can see how to make them at home)
MATERIAL WE WILL NEED AND SHOWN IN THE VIDEO:
- KitchenAid mixer or stand mixer
- KitchenAid glass bowl
- round pan 18 cm diameter*, removable (at least two recommended)
- rotating cake stand
- bowls
- whisk
- silpat
- saucepan
- wide frying pan
- large pot + skimmer
- food processor
- digital cooking thermometer
- pastry spatula
- cake smoother
- digital kitchen scale
- cooling rack
- piping bags + BS118 nozzle + Wilton 2 nozzle
- pastry brush
- precision tweezers (optional)
* In the video I specify 20 cm, it is a typo. The mould you should use for all the preparations is 18 cm in diameter.
REMEMBER TO ENJOY SWEETS IN MODERATION. SUGAR SHOULD BE CONSUMED OCCASIONALLY AND NOT BE PART OF YOUR DAILY DIET TO MAINTAIN A HEALTHY LIFESTYLE.
Instructions
FIRST DAY
Prepare vanilla sponge cakes.
- Preheat the oven to 355ºF/180ºC, heat up and down.
- In the bowl of the mixer add the eggs and sugar and whisk on medium-high speed until you obtain the point of ribbon, letter point or ‘monter au ruban’ in French. You should beat the eggs until the mixture is voluminous and falls evenly and continuously, like a ribbon or string. The process can take 10-15 minutes.
- While the eggs are being whipped, prepare 18 cm diameter moulds.
- Grease them with butter and line with baking paper, base and sides. Set aside.
- Once the eggs are beaten, add the vanilla and beat for a few seconds so that it is evenly distributed.
- Stir in the sifted flour in 2-3 batches, using a whisk to mix it in. Use gentle, encircling motions to break up as few air bubbles as possible in the mixture.
- Divide the batter into two equal parts and pour into the moulds, tapping gently on a work surface to settle the mixture.
- Bake for 18 minutes. Before removing from the oven, check that the cake is cooked by poking a toothpick into the centre of the cake. The toothpick should come out clean.
- Remove from the oven and place the mould on a wire rack. Leave to cool, unmould and cool the biscuits upside down.
- NOTE: If you prepare the cakes a day in advance, wrap well in plastic wrap and set aside at room temperature.
Chocolate sponge cake.
- While the vanilla sponge cakes are baking, you can prepare the chocolate sponge cake.
- In the bowl of the mixer, add the eggs and sugar and whisk on medium-high speed until you obtain a ribbon point, letter point or ‘monter au ruban’ in French. You should beat the eggs until the mixture is voluminous and falls evenly and continuously, like a ribbon or string. The process can take 10-15 minutes.
- While the eggs are whipping, prepare the mould.
- Grease with butter and line with baking paper, base and sides. Set aside.
- Once the eggs are beaten, add the flour and the sifted cocoa powder in 2-3 batches, using a whisk to mix them together. Use gentle, encircling motions to break up as few air bubbles as possible in the mixture.
- Pour into the tin and tap gently on a work surface to settle the mixture.
- Bake for 18 minutes. Before removing from the oven, check that the cake is cooked by poking a toothpick into the centre of the cake. The toothpick should come out clean.
- Remove from the oven and place the mould on a wire rack. Leave to cool, remove from the mould and cool the cakes upside down.
- NOTE: If you prepare the sponge cake a day in advance, wrap well in cling film and set aside at room temperature.
Prepare meringue disc.
- Preheat the oven to 212ºF/100ºC, heat up and down.
- Whisk the egg whites until frothy.
- Add the sugar, little by little, while beating the egg whites.
- Once all the sugar has been incorporated, whip until the meringue is firm and very glossy.
- Line a 18 cm diameter springform pan with baking paper.
Put the meringue inside the mould and spread it out to form a disc, making sure it is as level as possible. Keep in mind that this will be one of the layers of the cake. - Bake, placing the cake tin in the middle of the oven, for 2 hours and 15 minutes.
- Remove from the oven and leave to cool completely in the tin on a wire rack.


Prepare syrup.
- Add water and sugar to a saucepan. Place over medium heat and bring to the boil. The sugar should be completely dissolved.
- Once it comes to the boil, add the spice clove and reduce to medium heat, cook for 5 minutes and turn off the heat.
- Set aside until ready to use.
Apricot paste (dried apricots).
- Place the dried apricots in a heatproof bowl with enough boiling water to cover them.
- Leave to stand for 1-2 hours to hydrate and make them tender and moist.
- After this time, place the drained dried apricots in a food processor and grind to a paste.
- Add the paste to a saucepan with the sugar and cook over medium heat for 3-4 minutes, stirring constantly.
- Transfer the paste to a bowl or bowl and leave to cool completely.
Baba de moça.
- In a saucepan, add the sugar and water. Cook over medium heat, without stirring, until it reaches 244ºF/118ºC.
- Turn off the heat and leave to stand for 5 minutes.
- While the syrup is resting, pass the egg yolks through a sieve to remove any impurities. Set aside.
- Once the resting time has elapsed, add the coconut milk to the syrup and whisk with a whisk to homogenise.
- Pour, in a continuous stream, the syrup and coconut milk mixture over the egg yolks while whisking at the same time. This will temper the egg yolks, preventing them from curdling into a lumpy cream.
- Once all the syrup is integrated, transfer the mixture to the saucepan and cook over medium-low heat, stirring constantly, until thickened. This process can take between 8-10 minutes.
- Once it has the consistency of the video, transfer the cream to a bowl and cover with cling film (touching the surface of the cream). This will prevent the surface from drying out and forming a crust.
Pecans brittle.
- In a medium saucepan or large frying pan, add the sugar and place over medium heat.
- Let it melt without stirring. Once it starts to caramelise, stir often to prevent some areas from burning and to break up any sugar that has not yet melted. Reduce the heat a little if necessary and be careful not to over-brown the sugar, otherwise the caramel will become bitter.
- Stir in the pecans and mix for a few seconds to coat them with the caramel.
- Transfer the caramelised nuts to a silpat and leave to cool completely.
- Once cooled, grind in a food processor and set aside in a bowl.
Whipped cream for the filling.
- The cream must be chilled for at least 24 hours.
- The bowl in which the cream is whipped must be cold.
- Pour the cream into the cold bowl together with the icing sugar. Whip on medium speed.
- Increase the speed gradually, but never reach maximum speed. Medium-high speed is ideal. Be careful not to over whip or you will cut it and you will get butter...
- Keep in the fridge until ready to use.
Assemble the cake.
- Place a non-slip baking sheet together with a cake base inside a 18 cm diameter springform pan.
- Line the sides with a sheet of acetate, it will help to hold the cake in a perfect shape. Fasten the two ends of the acetate sheet with a bit of tape.
- Spread a small amount of whipped cream on the cake disc and place the first vanilla sponge on top.
- Soak it well with the syrup.
- The whipped cream you have whipped for the filling will be used in 3 layers of filling, I recommend that one of them has a little more quantity than the other two (the one you will use to cover the meringue disc).
- Spread a layer of whipped cream over the vanilla sponge cake. On top of this, spread the apricot paste. Make sure it covers the entire surface evenly.
- Place the chocolate sponge cake and generously soak it in the syrup.
- Spread a layer of whipped cream on the surface of the sponge cake and, on top of it, all the yolk and coconut cream (baba moça). Sprinkle chopped caramelised pecans over the yolk cream.
- Place the meringue disc, you may find it a little difficult to fit it on the acetate. Don't worry if it breaks or cracks a little, it won't show later.
- Spread the last layer of whipped cream, which should be a little more than the other two, and sprinkle chopped caramelised pecans on top.
- Finally, place the last vanilla sponge cake, with the base side facing upwards for a better finish when decorating, and carefully adjust.
- Cover with cling film and refrigerate until the next day.
- NOTE: Keep the excess syrup, you will use it for the top cake the next day. Also keep the surplus chopped pecans, you will use them to decorate the sides of the cake.
SECOND DAY
Prepare spun egg.
- In a large pot, add the sugar and water. Place over medium-high heat and leave until it reaches 226º-230ºF/108º-110ºC.
- Meanwhile, pass the egg yolks through a sieve to remove any impurities.
- Pour the yolks into a piping bag with a Wilton 2 nozzle.
- Prepare a large bowl with very cold water from the fridge. If you wish, you can add ice cubes.
- Once the syrup has reached this temperature, pipe the egg yolk over it to create the egg strands.
- Place the piping bag slightly above the pot, so that the threads will be thinner when they reach the syrup, and create circles of egg yolk threads close to the edge of the pan. As they fall, you move inwards towards the inside of the pot. Don't pour it all in at once, but in batches.
- Cook in the syrup for about 15 seconds, remove with a slotted spoon, then place in the bowl of cold water.
- Stir the egg strands in the water to stop the cooking, remove from the water and drain between your hands. Place the spun egg in a colander, with a bowl underneath, to drain off any excess water.
- Repeat the same process as many times as necessary with the remaining yolk.
- There are several important points in this process to ensure that everything goes smoothly, which are listed below.
IMPORTANT STEPS IN THE PRODUCTION OF THE SPUN EGG.
- If the syrup is too thick, when the yolk falls on it, the strands will be thicker. It is important that the syrup is not too thick. In addition to the thickness, when you pick up the egg strands with the skimmer, you will notice that the egg strands stick to the skimmer and when you put the skimmer in the bowl with cold water, the syrup will turn into a thick paste. It will be very difficult to remove the egg strands from the solidified syrup and the skimmer.
- Between cooking the egg strands, I recommend lowering the heat to a gentle simmer to prevent too much water from evaporating. When you drain the egg, the syrup should be bubbling so that it cooks quickly.
- If you notice that the syrup thickens too much, add a little water to lighten it and finish cooking the egg yolk.
- The spun egg should be immersed in cold water to stop the cooking time and allow the sugar molecules to cool so quickly that they do not have time to crystallise. The result is a soft and flexible strand.

Let the spun egg dry.
- Once you have cooked all the egg yolk, you should dry it to remove any excess moisture.
- Place kitchen paper in a container and place all the spun egg on top of it.
- Cover with kitchen paper and press down to encourage the water to be absorbed.
- Leave to rest and dry while you finish decorating the outside of the cake.
Whipped cream for outside decoration.
- The cream must be chilled for at least 24 hours.
- The bowl in which the cream is whipped must be cold.
- Pour the cream along with mascarpone cheese into the cold bowl together with the icing sugar. Whip on medium speed.
- Increase the speed gradually, but never reach maximum speed. Medium-high speed is ideal. Be careful not to over whip or you will cut it and you will get butter...
- Keep in the fridge until ready to use.
Decorate the cake.
- Unmould the cake, carefully take it out of the mould and remove the acetate. Gently peel it off to prevent any of the filling from sticking to it and leaving gaps.
- Cover the outside of the cake with the cream and mascarpone cream. Smooth the surface with the help of a cake smoother.
- Decorate the entire side of the tart with the chopped caramelised pecans (I got just the right amount). If you wish, you can make some more to avoid running out.
- Pipe the rest of the cream and cheese cream into a piping bag with a BS118 nozzle or another of your choice.
- Decorate the top with the garnish suggestion I show you in the video or another of your choice.
- Decorate the central part and the gaps between the cream decoration with spun egg. I recommend using tweezers to arrange the egg more comfortably.
- Finally, decorate with pecans and Maraschino cherries.

Notes
- Remember that to make the cake you need 18 cm diameter springform cake tins. I know that in the video I mention 20 cm moulds, but that's a typo.
- The acetate helps the cake to keep its perfect shape and, if you use liquid or moist ingredients (not on this occasion), they will stay in place. It also favours a perfect unmoulding.
- When whipping the cream, remember that it must be very cold to whip well. Also be careful when whipping so as not to over whip and spoil the cream. Whenever it is not being used, keep it refrigerated so that it does not lose its firmness.
- Traditionally, the outer cream decoration is not made with mascarpone cheese. In my case, I decided to incorporate this ingredient because it gives the cream firmness and the final finish is more durable and attractive. But you can use whipped cream if you prefer.
- To make the cakes you do not need to add leavening agents such as baking powder. If you beat the eggs well, you get a sponge cake with volume, fluffy and airy.
- I use cocoa powder to make the chocolate sponge cake. This ingredient thickens the final batter, which is why a small part of the flour is removed.
- The syrup is made with a spice clove, it gives a wonderful and interesting aroma. If you wish, you can omit it.
- To make the apricot paste, I recommend hydrating them with boiling water for a minimum of one hour and a maximum of two hours. This way they will be juicy and you will be able to grind them very well to obtain a wonderful paste. Then cook for a few minutes with sugar to sweeten slightly and remove any excess water.
- In my case I have used pecans, but you can use normal walnuts to make the nut brittle, if you prefer.
- The coconut yolk cream, baba moça, is very similar in appearance to yolk pastry cream. It is important that you follow the detailed process to achieve a good result and get a silky smooth cream, not lumpy or clotted looking.
- All fillings must be cooled before being incorporated as a filling in the cake.
- The baking time for the meringue disc is for that amount of meringue and that size of tin. If either varies, adjustments should be made to the final baking time.
- The meringue disc should also cool before being placed on the cake, but I advise you to do this the same day you are going to proceed to assemble it. You can do it first thing in the morning.
- Follow all the tips detailed in the post to make the spun egg, especially with the density of the syrup, this step is important. You will have a little more spun egg than you will need for the cake, you can keep it refrigerated for 3 days or freeze it.
- The decoration is optional, you can do it as I show you or as you choose.
- The cake, once assembled, can be kept refrigerated for 3 days.


I remind you that you can watch all my videos on my YouTube channel. If you subscribe and turn on the little bell, I will be eternally grateful!
I wish you a wonderful Sunday afternoon and happy Easter!
Lots of love,
Eva
Sources: Pantucci Panificadora, Gazeta do Povo, Bake-Off Brasil, Santa Teresa Gourmet