Sourdough bread 77% hydration
When we see high hydration doughs, at first, they can frighten us. It takes us a terrifying fear and we are invaded by the sensation of “That kind of dough I can not do it.” Of course you can, besides they are the most grateful doughs to work with. That is why today we will see how to make a sourdough bread 77% hydration.
It is a high but moderate hydration, without reaching the hydration of chapatas (my recipe has 86% hydration) but overcoming the line of the “comfortable doughs”, as I call them. These types of doughs are around 60-65% hydration and are very simple to work and shape, which we could do with closed eyes and 27 times a day. Today we take a step further and we will see how to work with a higher hydration and make a great batard / loaf.
There is one aspect that used to happen to my students on my workshops and was that when they work with high hydration doughs, in some cases, they could not develop the gluten mesh properly.
What is the reason for this?
When we prepare a high hydration dough we must act in the same way as if we worked with an enriched dough.
We should not pour all the water at once because it will make too difficult the kneading and subsequent development of the dough.
I remember that I told you in some post, but I do it again. Doughs with very low or high hydration are much more complicated to develop and get a good result. Unless we know how to act on it.
Whenever we go to elaborate a dough with a hydration of more than 70-75%, I recommend following the following steps:
- The most important of all, to know in detail the flour with which we are going to work. It is important to know what absorption capacity has to know if it is the right flour to work with it in high hydrations. Surely you will ask yourself …
- How do I know how much absorption capacity my flour has? Trying on it. Approximately we can know by its strength or quantity of proteins how much can endure … but the ideal thing is to work with it and make tests to see its limit.
- How will I know if I have exceeded the limit of water that admits the flour? Because it can not absorb it. It will become very shiny and the surface will look watery, as if it were releasing water.
- Water must be added little by little. We will start adding 60-62% of the total water and knead until obtaining a moderate gluten development. From there, we will begin to pour water little by little and kneading at the same time until it is completely integrated and the gluten has been developed a bit more. We will continue working this way until we add the total hydration.
- Make rest so the kneading process does not become eternal … and not lose dough along the way. The rest improves the doughs a lot. After each rest, of 5-7 minutes, we will notice an improvement in the incredible gluten structure. I remember pupils who told me that after finishing kneading the chapata, they had lost more than half of the dough. A lot of it remained adherent in different places of the kitchen, chunks of dough jumped by the worksurface … if we add the water as I comment and we make rest, this will not happen.
- Fold during the bulk fermentation. It will give us strength to the dough and this will come in handy. It’s like continuing to knead in the background. I remind you of this post where I tell you about the benefits of folding a dough.
Having these clear steps, nothing has to go wrong. On the contrary, you will become addicted to the high hydrated doughs and you will want to do them at all hours. Believe me, I do not lie to you.
What else should I keep in mind when working with a high hydration dough?
Mainly that the greater is the hydration of a dough, the greater its rate of fermentation. The more hydrated doughs rise faster than the less hydrated doughs. Therefore, in your first time with this kind of dough, you must control the fermentation time because it can be faster than you accustom.
Another aspect to take into account, not too important but that helps, is that a high hydration dough is best scored after being in the cold. The dough hardens slightly, not a crazy thing, and facilitates this step. I mention it for those who prefer to make bulk fermentation in cold and the second at room temperature.

| INGREDIENTS | BAKER´S % | SOURDOUGH | REST | TOTAL |
|---|---|---|---|---|
| Shipton Mill Wheat | 11,25% | 67,5 g | 67,5 g | |
| T45 wheat flour | 85% | 510 g | 510 g | |
| Shipton Mill Rye | 3,75% | 22,5 g | 22,5 g | |
| Water | 77,5% | 90 g | 375 g | 465 g |
| Salt | 1,8% | 10,8 g | 10,8 g |
Ingredients
SOURDOUGH BREAD WITH 77% HYDRATION:
SOURDOUGH 100% HYDRATION:
- 6,34 oz (180 g) 100% hydration starter refreshed with 80% Shipton Mill wheat flour and 20% Shipton Mill rye flour
Here you can read how to make water yeast fruits or here how to make common sourdough (By the moment, both are only available in Spanish)
FOR THE DOUGH:
- 18 oz (510 g) T45 flour
- 13,2 fl oz (375 g) water
- 0.38 oz (10,8 g) sea salt
Instructions
FIRST DAY
Make bread dough.
- In a large bowl add flour along with water, mix with your hands (in my case I used my KA for 4 minutes) until it is well hydrated and looks smooth. Cover with plastic wrap or cotton cloth and allow to make autolysis for 30 minutes.
- Add sourdough and mix to speed 1 for 15 minutes.
- Once it is fully integrated, add salt and continue kneading.
- Transfer to a work surface, without flour, and knead by hand to finish.
- Combine kneading with resting time. Knead 2-3 minutes and let sit 5-6 minutes. Total time kneading by hand will be 4-5 minutes.
- To check the gluten mesh, we must always do it after a rest.
Make bulk fermentation.
- Grease with olive oil a bowl or recipient and put the dough inside. Cover and make a bulk proof for 2 hours and 30 minutes at room temperature. My home temperature was 82,4ºF. Turn and fold after 30 minutes three times.
- Let rise until almost double in sized.
- Dust with rye flour a banneton, set aside.
Shape the dough.
- Preshape into a boule (ball), be careful not to degas too much, and allow to bench rest for 15 minutes cover with a cotton cloth.
- Shape a batard, how I made this from Baltic Bake House again.
- Place seam-side up in banneton, cover with a cotton cloth and put in the fridge for 24 hours.
SECOND DAY
Bake the loaf
- Preheat oven 445ºF* at least 30-40 minutes prior to baking with your stone or steel sheet on it positioned on final rack. Put inside a pan with volcanic stones, this helps to get steam in the baking.
- Transfer the bread from the banneton over a wooden board cover with parchment, seam side down. Score the bread.
- Place the bread into the oven and pour boiling water over the pan with volcanic stones. Close the oven door immediately to trap the moisture.
- Bake for 20 minutes at 410ºF.
- After first 20 minutes, open the oven door to allow steam goes out, remove the track with volcanic stones with kitchen gloves and reduce oven temperature to 390ºF. Bake for 10 minutes.
- Reduce temperature to 375ºC and bake 10 minutes more. Finally bake with convection at 375ºC for 10 minutes. Bread will get a better crust this way.
- Total bake time is 50 minutes.
Ending the bake...
- Once bake has ended, turn off the oven and let sit the bread inside the oven with the door ajar for 15 minutes. Remove from the oven and let cool over a rack.
PRESERVATION:
- Bread can be stored for up 3-4 days cover with cotton cloth. If the beginning is dry, cut the first slice and inside will be still tender.
- You can cut the bread into slices, cover with plastic film and freeze. This way is the better to make perfect toast each morning.
Notes
- My bread has stuck to the banneton ... You have to be careful with high hydration doughs when we place them in the banneton. Sprinkle this with flour (rye better) to prevent the dough from sticking during the final proof.
- In highly hydrated doughs I do not recommend using cane banneton, despite sprinkling with flour, because the dough tends to get into every corner. There is a good chance that it will stick to the banneton and when it dumps the bread, it will tear.
- When scoring the bread, the blade adheres to the dough. It is normal, the hydrated doughs are more difficult to score. What we must do is wet the blade just before using it, this step will help us a lot. Besides being quick to carry out this gesture.
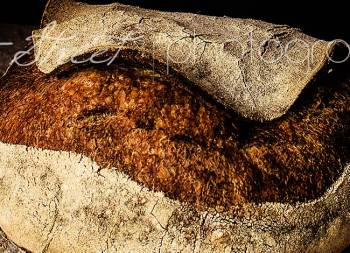
- My bread came out from the oven very crunchy but as it cools it loses that feature. It lacked end baking time, we know that not all the ovens work in the same way and in some cases may need to prolong it. What has happened is that the internal moisture has migrated to the crust causing it to soften.

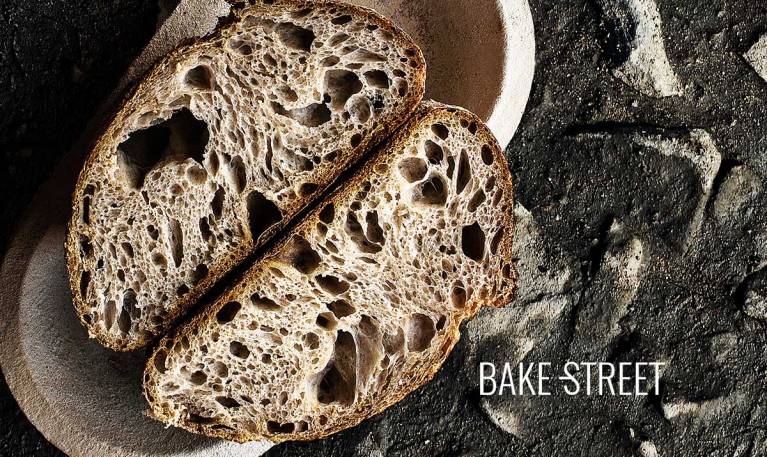
That big hole is a fault that was created when shaping the bread. Surely it originated due to rest of flour that I sprinkle on the bread to be able to manipulate it without it adhering to my hands.
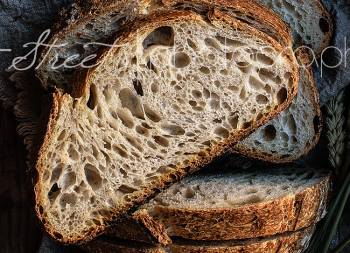
This sourdough bread 77% hydration can be your first step to the hydrated doughs, for which you have not yet encouraged them. The result is a bread with a slightly moist crumb and a slightly thinner crust than we usually get with less hydration.
It can be made thicker by prolonging the final baking time, but I think it is not necessary to sacrifice that loss provided that we achieve a good balance of the cooking point so that the moisture does not migrate to the outside.
I hope to see your loaves soon!
Big hugs,
Eva