Chocolate marble bread
Today’s recipe has a curious story behind it. Not as cheerful as I’d like, but now I’ll give you a little more detail. During these holidays, at the beginning of the week before the holidays arrived, I prepared this chocolate marble bread. The truth is that I´ve wanted to do it for a long time.
My intention was to leave me some recipes prepared, so that the return would be more calm and I would have advanced work. This means that if unforeseen events arise, I don’t have to run.

The fact is that I made several recipes and one of them was this bread. I prepared it, recorded the whole process and when I went to preheat the oven to bake it…. What do I find? My oven’s broken! I used it the day before without any problems. My displeasure could not be more immense.
Not only because of all the time I spent baking bread, recording it… but also because I had broken the appliance I use most often (and which is not exactly cheap). Well, the truth I use all of them, but this one is essential in my day to day life. It’s relatively new, so I was waiting to see if I could get it fixed. But finally no, I had to buy another one.
In order to save it, we went to my sister’s house at 9 p.m., who lives 20 minutes away by car, and baked it there. Good thing it’s not too hot weather and I was able to retard it in the fridge for a while while I preheated the oven.
It all worked out in the end.
But I left my sister the house scented and I couldn’t leave her a piece because the next day I had to finish recording and take pictures, hahaha. Well, I’ll make it up to her!
So, between now and the time I have my new oven, I will leave you with some recipes that do not require an oven. Unless I make little getaways to my sister’s or my parents’ house!

I admit that at first a wall was put in front of me. It seemed that there were no other possible methods of cooking than the oven. Not only for bread (we are going to take this very badly), sweets and pastries in general, but also for the rest of the preparations. Mostly I cook in the oven almost everything and for me it has been quite a chore.
But, well, this awakens ingenuity and other ways of preparing things at home.
Making the bread.
Leaving aside this mishap, which will someday be a funny anecdote (not yet, actually), let’s see how to make this delicious bread.
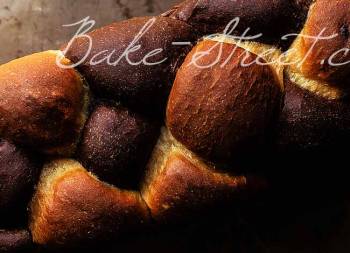
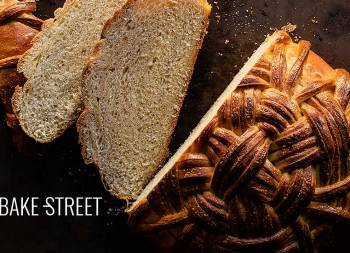
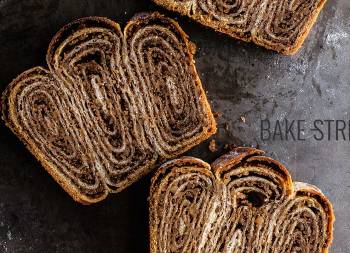
As you can imagine, the first thing that catches our attention is the inner chocolate laminate. Very thin layers of chocolate that are drawn between a soft and super fluffy crumb.
To achieve this laminate, the first thing we have to do is to prepare a chocolate sheet (the way I specify in the elaboration) and freeze it. This is an essential step.
The consistency of the sheet, if we just refrigerate it, will be dense/creamy and we need it to have a firm consistency.

Working the laminate and shaping the bread.
To achieve this laminate, we will have to work the dough in the same way we do with puff pastry or Danish dough. We will make folds and work the chocolate the way we work the butter in these elaborations.
Once we have our dough perfectly laminated, we will give it the look we want.
In my case, I have chosen to make a braid of six strips, which, of course, is not mandatory. You can make one of three strips or even make it like a normal loaf of bread. Here I leave it entirely to your choice.
If I would encourage you to try it, I’m sure that the video will be a great help to you to do it. In addition, we can stop as many times as we need, both the video and the shaped, to achieve this appearance.
Ingredients for a 8 x 4 x 4 inches (20 x 10 x 10 cm) pan
Recipe based from Carol Easy Life
FOR THE DOUGH:
- 9,2 oz (260 g) AP flour
- 0,7 oz (20 g) cake flour
- 4,4 oz (125 g) whole milk
- 1 large egg
- 0,7 oz (20 g) unsalted butter at room temperature
- 0,9 oz (25 g) sugar
- 0,07 oz (2 g) dried baker yeast
- 0,14 oz (4 g) salt
FOR THE CHOCOLATE SHEET:
- 1,75 oz (50 g) pure chocolate
- 0,7 oz (20 g) unsalted butter
- 0,7 oz (20 g) AP flour
- 0,17 oz (5 g) cornstarch
- 0,35 oz (10 g) unsweetened cocoa powder
- 2,1 oz (60 g) whole milk
- 0,7 oz (20 g) sugar
- 1 large egg white
Instructions
Make the chocolate sheet.
- Melt the chocolate and butter in separate bowls. Set aside.
- In a medium bowl add the flour along with the cocoa powder and the cornstarch. Mix with a whisk.
- Add the milk together with the sugar and the egg white. Mix until a homogeneous mixture is obtained.
- Finally, add the melted butter together with the chocolate and mix again until a uniform mixture is obtained.
- Pour into a saucepan and place at medium low heat, whisk until the mixture begins to thicken, it will take a few minutes. We'll get a dense paste.
- Remove from heat and leave to temper for 3-4 minutes.
- Pour the batter over a sheet of film and place another sheet on top. Stretch out to form a 7 inches (18 cm) square. To achieve a perfect square, follow the steps shown in the video.
- Put the film in the freezer* until it is ready for use.
* See notes.
Make the dough.
- Keep 2 tablespoons of milk.
- In a bowl add the 2 types of flour together with the egg, milk, salt and sugar. Mix with your hands or the hook in a stand mixer to amalgamate the ingredients.
- Add the butter into the mixture and work to start mixing it.
- Dissolve the yeast in the milk we had reserved and pour it to the dough. Knead again until it is completely integrated.
- Knead until you get a good gluten development. The dough must be elastic and not cracked. It will take us about 30 - 35 minutes.
Make bulk fermentation.
- Once we have a perfect gluten development, make a ball with the dough.
- Grease an hermetic container, place the dough inside and let it rise until it doubles in size. In my case it took 4 1/2 hours at 71,6º F (22ºC).
Roll out the dough and make the folds.
- Dump the dough on a work surface sprinkled with flour and roll out the dough. We will form a rectangle of 14 x 7 inches (36 x 18 cm).
- Take the chocolate sheet out from the freezer, remove the film and place it in the middle of the dough. The width of the chocolate sheet and the width of the dough will be the same.
- Fold the ends of the dough over the chocolate sheet and bring each of them to the center. Seal the joint of both folds well both in the centre and on the sides. The dough must be completely sealed on each side.
Stretch the dough and make the first fold simple.
- Lightly sprinkle the work surface with flour and proceed to stretch the dough. Pass the roll of a single pass, from the center towards the ends, and avoiding insisting in the same place.
- As we stretch the dough, we will try to lift this from the work table from time to time to make sure it does not stick to the table (it could damage the final layers making breaks). In case it is necessary to sprinkle a little flour, we will do it without exceeding.
- Stretch until reaching about 16 x 7 inches (40 x 18 cm).
- Make the first fold, take one end to the center and repeat the same process with the other end placing it on the previous one. Just as if we were closing a triptych.
- Roll gently on the surface to join the folds.
Make the second fold.
- Sprinkle the work surface lightly with flour and strain the dough.
- Put pressure on it but without overdoing it.
- Stretch again until reaching the same length as the previous time, 16 x 7 inches (40 x 18 cm)
- Fold in the same way as the previous time.
- Cover with film and refrigerate for 30 minutes.
Make the last stretch before shaping the bread.
- Sprinkle the work surface lightly with flour and stretch the dough. We will give dimensions of 10 x 8 inches (25 x 20 cm) approximately.
- We will make three longitudinal cuts in the dough without being able to cut one of the ends completely. This will keep the braid together.
- These three strips, we will cut them in two, so that in total we will obtain 6 strips.
- Braid following the process of the video.
- Insert the ends and sides towards the bottom of the piece and place them in a pan lined with baking paper.
- Cover with film and leave to rise until almost it triples in size. in my case, it took 4 hours at 73,4º F (23ºC).


Bake.
- Preheat the oven to 355ºF (180ºC).
- Brush with salted beaten egg + pinch of salt and place in the oven at medium heat for 35 minutes.
- After the first 20 minutes, keep an eye on the bread. If it has browned enough, cover it with aluminum foil until the baking is finished.
- Remove from the oven and leave to stand for 5 minutes in the pan. Unmould and leave to cool completely on a rack.


Notes
- When we shape the chocolate sheet, it will not be firm. To freeze it and make sure it is straight and flat, place it on a plastic cutting board and store it in the freezer.
- The chocolate sheet must be frozen in order to work with it and make folds. If you wish, you can prepare it the day before.
- You must work the dough with care and love, taking care not to take too long to make the folds.
- I only let the dough rest once in the cold because the puff pastry is not as delicate as if we were making a puff pastry or Danish dough. In fact, this repose, we will do it to let the dough rest and lose tension.
- If you don't dare to make a six-strand braid, you can make a three-strand braid without problems. The result will be beautiful too.


This chocolate marble bread is not only beautiful, it is an absolute marvel. Subtly sweet in taste, with a hint of cocoa and a very soft and fluffy interior.
What to say that I don't see the day to repeat it and with some variants. I came up with some ideas working the dough with this format. I think that the idea of cocoa laminate can be a great match for other options. I hope to show them to you very soon!
Have a great weekend, see you on Monday!
Big hugs,
Eva