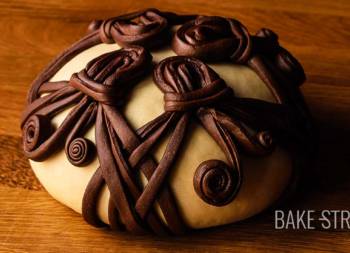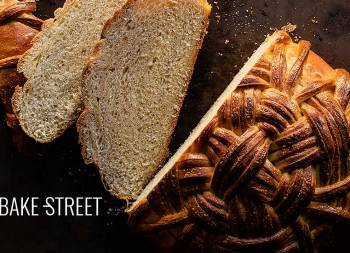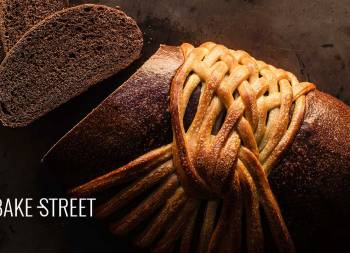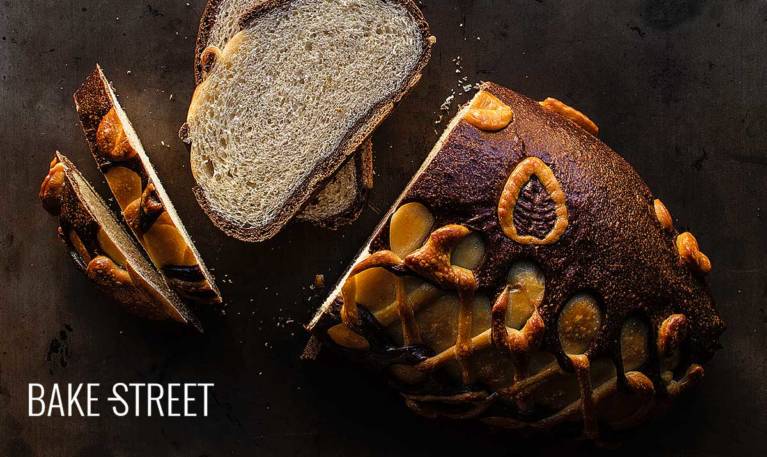
Corset Bread {Video recipe}
There are times when I start to make a recipe, don’t know how it will end. It often happens to me that when I’m working, I get bombarded with ideas that I want to make into bread later on. But until I’m in front of the dough working with it, I don’t really know how it´s going to turn out. An example of this is the Corset Bread I bring you today.
One day I thought I could create a pattern with the dough simulating a printed fabric, yes, my crazy ideas. The fact is that with a sablée dough, sucrée… even fresh pasta, this does work well. But a dough that is then going to be subjected to a rising process, et’s say that those prints will end up with a 3D effect.
Creating my Corset Bread.
My idea was to shape a bread that would later be covered with a “patterned dough” and joined with a strip the same way we closed a corset. As happens on many occasions, the idea in my head is much better than the one I get after trying to carry it out.
To be honest, I was not entirely satisfied with this bread. In fact, I even thought I wouldn’t publish it because I wasn’t convinced. But at home they told me to do it, that did not leave this bread in oblivion… According to them, I am too demanding of myself and this bread deserved to be shared. Well, I listened to them and today I show you this bread that will be more or less beautiful according to the eyes that look at it. That’s the conclusion I’ve come to.

Why Corset Bread?
One of the parts I like best and find it hardest to name the breads I create. For me it’s an important part because not only do I give shape and appearance to something I like and make withmyr own hands, but also give it a name that will be recognized. It reminds me of when I was little and had to name a pet. It couldn’t be just any name because it was going to be by my side for a long time. Something similar happens to me with this.
This time the search was easier because the simple method used to shape it is based on a piece that already exists. The Corset.
History of the corset.
The corset is a garment used to model and style the human figure, whether for aesthetic or medical purposes. The first corsets originated in the ancient civilizations of Mycenae and Crete, although in the West it appeared in the 16th century when its use in the court of Medici (a powerful and influential Renaissance family in Florence) became popular.
It was born with the purpose of beautifying the ladies of the aristocracy and nobility, achieving a conical, stiff and stylized torso. The first pieces were made entirely of metal, which reduced women’s mobility.

Starting from these first garments…
More complex and armed ones emerged in order to create a perfect silhouette. This was accompanied by other pieces that helped to support the entire dress.
In the seventeenth century in the European courts, the anterior conical torso was modified in order to narrow the waist and raise the female bust in addition to exaggeratedly enhance the hips using fillings. The materials change and metal or wood rods inserted in fabric are used. They were first used at a very early age and this garment accompanies women until the end of their lives.
After the French Revolution it fell into disuse.
It was considered an oppression toward women, as were socks, shoes and wigs. This piece was hated by Napoleon Bonaparte, he called it “The murderer of the human race” because it was believed that it was the cause of many natural abortions of the time, which would cause a decrease in birth rate.
In the year 1820 it reappears again, becoming more accessible and even becoming a popular cult garment. This is where the fragile and elegant figure emerges with the so-called “wasp waist”.
During the transition from the 19th to the 20th century a new trend arrived in Paris, the Belle Epoque, surrounded by an atmosphere of positivism and predisposition to progress. With the beginning of the 20th century, mentality and society changed in search of a more active woman and freeing her silhouette. The fashion of the 40-50s was based on this type of figure, although in 1958 the most natural lines returned. Currently, the use of this object is destined to haute couture.

Back to the bread…
YYou may be thinking that what a sermon I have given you about the history of the corset! But I didn’t just want to write the name. You know I’m very boring whit this, hahaha.
The story of this piece seemed interesting to me, and at the end it is related to the bread I share with you. It is decorated with a piece that only “can embellish” (according to the eyes that look), when what is under that layer will be the same as if we did not decorate it. In this case; flavour, aroma, texture…
I’m not going to entertain myself anymore, I leave you with the process of bread accompanied by its video 🙂
Ingredients
- 21,1 oz (600 g) T45 flour
- 10,5 oz (300 g) whole milk at room temperature
- 0,53 oz (15 g) cocoa powder + 0,85 oz (24 g) whole milk
- 0,12 oz (3,5 g) dry yeast
- 1 large egg (55 g)
- 2,65 oz (75 g) unsalted butter at room temperature
- 1,4 oz (40 g) honey
- 0,35 oz (10 g) salt
Instructions
Make the dough.
- In a bowl add the flour together with milk, egg and dry yeast.
- Mix the ingredients in the bowl until a homogeneous dough is obtained.
- Add the honey and knead until it is fully integrated. Add salt and mix again.
- Transfer to a work surface and start kneading. We will have to obtain a smooth, silky and developed dough.
- Once we have a medium-developed gluten, add the butter. The ideal is to do it little by little, waiting for the dough to absorb it and facilitate the kneading process.
- Knead for about 15-20 minutes to develop the gluten well and obtain an elastic, soft and very well developed dough. The dough, always after a rest, must pass the membrane test. Here's how to do it.
- If we do rest we must always cover the dough to prevent it from drying.
Divide the dough into 2 pieces to integrate the cocoa.
- Divide the dough into two pieces, one of 27,1 oz (770 g) and the other of 10,5 oz (300 g). Remember that if there are any pieces of dough left, these will always be in the centre of the dough before pre-shaping.
- Make a ball with the small piece and place in a bowl previously greased with olive oil. Cover with film and set aside to make bulk fermentation.
- Work the largest piece of dough. Add the cocoa powder together with milk.
- Knead until both ingredients are completely integrated. We must obtain a dough with a uniform chocolate colour.
- Make a ball with the piece and place in a bowl previously greased with olive oil. Cover with film and set aside to make bulk fermentation.
Make bulk fermentation.
- Let rise at room temperature for 4 hours, in my case at 70ºF (21ºC) or until it doubles in size.
- If we want to retard the dough in cold, let it rise 1-2 hours at room temperature, until it grows 1/3 of its volume and place in the fridge until the next day.
If we have retarded the dough in cold, temper before working.
- Remove the dough from the cold and let it warm for 2 or 2 1/2 hours. It's likely to even triple its size.
Shape the bread.
- Dump the white dough on a clean surface and degass gently.
- Using a scraper, cut a piece of dough weighing about 6,7 oz (190 g).
- Preshape the largest piece, if there are any pieces of dough left, we will place them in the center.
- Placee in a bowl, cover with film and let rest while working the other pieces.
- The piece that we have cut, we will stretch it with the help of a roller. We form a rectangle about 5,9 x 11,8 inches (15 x 30 cm).
- We'll cut three-four strips to make the weaved bread strip. With the help of two leaf cutters, we will cut several pieces in the rest of the dough. Cover with film and set aside.
- Dump the cocoa dough on a clean surface and degass gently.
- Roll with the roller to form a square about 11,8 inches (30 cm) on the side.
- Decorate the surface with the leaves we have cut. Once finished, lightly flatten the leaves with your hand to make sure they are embedded in the cocoa piece.
- Roll again the surface to even out both thicknesses.
- Take out the dough that you had preformed, dump it on the clean work table and shape it in the same way that we shaped a batard. Set aside.
- Turn the cocoa square so that the drawing is face down.
- Place the batard in the center of the piece of cocoa. Raise the edges to adjust the size and cut the excess dough.
- Using a 0,4 inch (1 cm) in diameter pipping tube, we will create holes near the edge of the piece. This way we'll insert the strip.
- Take a strip of white dough and braid it through the holes you have created. If there is excess dough on the ends, cut and seal.
- Once we have the bread shaped, with great care, we move on to the baking tray lined with baking paper.
- Lightly grease the surface of the bread with olive oil, cover it with film and let it rise until it doubles in size. In my case it was 4 hours at 71,6ºF (22ºC).


Bake.
- Preheat oven to 355ºF.
- Brush the bread with whipped yolk with milk and salt, place it in the oven for 40 minutes. Watch the final minutes of baking, if the bread gets very colorful, cover it with a sheet of aluminum foil.
- Remove and allow to cool completely in a rack.
Notes
- T45 flour is equivalent to a special wheat flour for puff pastry, with a W=280 and good elasticity.
- Can honey be replaced by sugar? Yeah, no big deal. Just bear in mind that invert sugars speed up the proofing process compared to normal sugar.
- The cocoa powder I use is sugar-free, so the flavor will be bitter. But on this occasion I consider that there is no need for a superior addition of honey or sugar, as I suggested in Shibari bread, since the amount of dough used is only for decoration.
- When you cut the cocoa strips, always cover them with plastic film while you shape the bread. If the dough is dried and found, we can't use it to decorate the bread.
- Crearemos más tiras de las que necesitamos por si acaso alguna se estropeara. Por esa razón os especifico que debemos cortar tres, a pesar de no utilizar todas.
- He utilizado una boquilla para crear los agujeros, pero si tenéis un cortador redondo de 1 cm de diámetro, utilizad ese en su lugar.
- La forma de los cortadores que he utilizado son hojas, pero podéis usar aquellos que más os gusten o tengáis en casa.
- To know if our bread has finished the cooking time, remember that with a digital thermometer and checking its temperature we will know. It must be around185-195ºF.
- Preservation: This bread can be kept in an airtight bag for 4 days. If you prefer, you can freeze it in film wrapped portions.


If this weekend you want to be entertained, a good option is to prepare this Corset Bread to accompany you for a few breakfasts. The dough I have used is the same as in other braided breads I have left you before.
You already know that when I make this type of bread, my main purpose is to teach you a process of shaping with a dough that I know for sure gives good results for this purpose.
I hope you have a lot of rest, enjoy yourselves and see you again on Monday!
Big hugs,
Eva
Source: Wikipedia