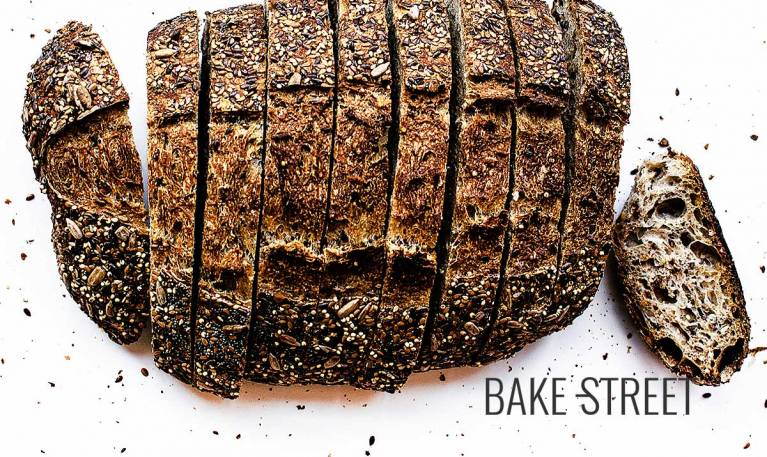
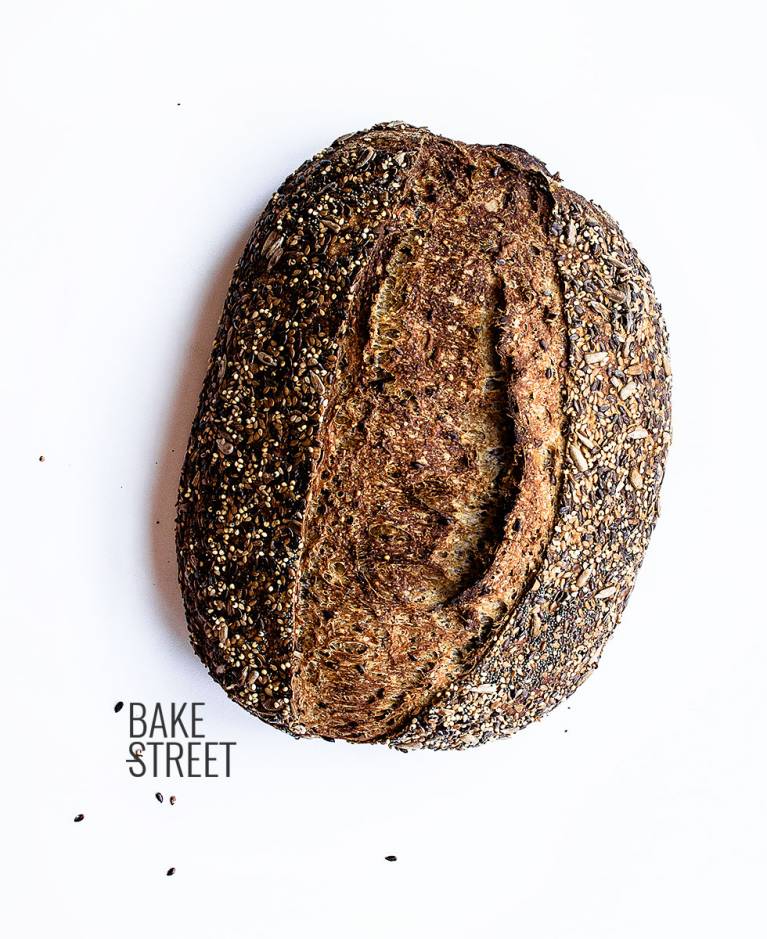
Potato and seeds sourdough bread
Remember that I recently left you a post in which I talked about high hydration breads? For those of you who haven’t finished locating it, this is it. Well, today I bring you a bread with a much higher hydration than that which was intended to be a first contact with this type of dough. A bread with 94% hydration which result is this potato and seeds sourdough bread.
Many times not everything is what it seems because, as I have told you on many occasions, not all flours behave the same way. When we talk about hydration above 80%, we immediately come up with chapatas, crystal bread, super aerated breadcrumbs that we could almost keep peaches inside… And it doesn’t always have to be like that.
Depending on the flour we use, we will obtain one result or another. In this case, the result would not have been similar if instead of using the flours that I specify below (whole wheat flour, rye, strong/bread flour) I had just used a plain flour. What’s more, there are likely to be some plain flours that can’t withstand such high levels of hydration.
Rye and wholemeal flour have a higher absorption capacity than plain/all purpose flour.

That is why I always put a lot of emphasis on this point.
This is one of the main reasons why the results you expect may vary from what you intended. There are also two other factors that influence this outcome:
- Potato flakes: part of the flour has been replaced by potato flakes. These have a high absorption capacity, which allows us to work with a greater amount of final hydration. It will also bring extra tenderness to the bread.
- Seeds
On this last point, I would like to go a little further. The seeds, when added to bread without a soaker, also absorb part of the hydration of the dough. At one point they can help us to solve a slight excess of unwanted hydration if we add them to the dough, but it doesn’t work miracles either.
What is a soaker?
It is simply to soak seeds, before they are integrated into the bread or dough, for several hours. Ideally, if they are going to be part of the interior of a dough, they should be previously toasted to give more flavor. But it is not essential.
How much water should I use to make the soaker?
The same weight of seeds is usually used as water, which is the amount they will normally absorb. It is important that you know the amount of seeds you use to make the soaker because, when it comes to integrating them into the dough, you need to know how much water they have absorbed.
You will only have to weigh them, after soaking and draining them, before adding them to the bread to know how much water they carry with them.
Why do I need to know how much water they have absorbed?
Because this will become part of the final hydration of the bread. In fact, you must subtract that amount of water from the final hydration of the dough.
Example:
If your bread has a final hydration of 400 grams of water and your soaker consists of 100 grams of seeds + 100 grams of water, the final amount of water to add will be 300 grams of water because the remaining 100 grams are already incorporated in the seeds.
How do I toast the seeds?
The simplest thing is the oven, although you can do it in a iron skillet if you want. Spread the seeds on a tray lined with baking paper and bake at 355ºF for 10 minutes. Take out and pour in cold water to cut the cooking and prevent them from continuing cooking can become bitter. Done 😉
The process is different when we use the seeds for the outside.
When we decorate a bread with seeds on the outside, we don’t have to do anything beforehand. We are interested in making them dry so that they adhere easily to the dough and, in addition, that they are raw. The reason for this is simple: they will be exposed to heat during the entire cooking process and will be roasted.
You already know that both the seeds and nuts, if we roast them too much, come to have a bitter and unpleasant taste.
What more good things do seeds bring to the doughs?
By favouring moisture retention, it makes them fresh for a much longer period of time, prolonging their useful life. This is also true for soaking grains.
With this we learn one more thing and it is that not always a high hydration is directly related to alveolate breads and ultrafine crust. We must always keep in mind the ingredients/products we are using to make our bread, know them inside out, know how they work and how to take advantage of it when baking.

It’s been a long time since I left you guys some music. Today I share this song of Whilk & Misky “Clap your hands” ( Youtube link) to start the day 😉
| INGREDIENTS | BAKER´S % | SOURDOUGH | REST | TOTAL |
|---|---|---|---|---|
| Shipton Mill Wheat | 11,25% | 67,5 g | 67,5 g | |
| 1878 flour | 43,3% | 260 g | 260 g | |
| Shipton Mill Rye | 3,75% | 22,5 g | 22,5 g | |
| Strong/bread flour | 16,7% | 100 g | 100 g | |
| Whole wheat flour | 16,7% | 100 g | 100 g | |
| Potato flakes | 8,3% | 50 g | 50 g | |
| Seeds (inside) | 14,1% | 85 g | 85 g | |
| Water | 94,1% | 90 g | 475 g | 565 g |
| Salt | 1,8% | 10,8 g | 10,8 g |
Ingredients
POTATO & SEEDS SOURDOUGH BREAD:
SOURDOUGH 100% HYDRATION:
- 6,34 oz (180 g) 100% hydration starter refreshed with 80% Shipton Mill wheat flour and 20% Shipton Mill rye flour
Here you can read how to make water yeast fruits or here how to make common sourdough (By the moment, both are only available in Spanish)
FOR THE DOUGH:
- 9,17 oz (260 g) 1878 flour (if not, plain flour with 5% rye)
- 3,5 oz (100 g) strong/bread flour
- 3,5 oz (100 g) whole wheat flour
- 1,8 oz (50 g) potato flakes
- 3 oz (85 g) seeds +1,8 oz (50 g) seeds for outside
- 16,7 oz (475 g) water
- 0.38 oz (10,8 g) sea salt
Instructions
FIRST DAY
Make bread dough.
- In a large bowl add flour along with potato flakes and water, mix with your hands (in my case I used my KA for 4 minutes) until it is well hydrated and looks smooth. Cover with plastic wrap or cotton cloth and allow to make autolysis for 40 minutes.
- Add sourdough and mix to speed 1 for 15 minutes.
- Once it is fully integrated, add salt and continue kneading.
- Transfer to a work surface, without flour, and knead by hand to finish.
- Combine kneading with resting time. Knead 2-3 minutes and let sit 5-6 minutes. Total time kneading by hand will be 4-5 minutes.
- To check the gluten mesh, we must always do it after a rest.
- Once the dough has a good gluten development, add the seeds (3 oz / 85 g), toasted or raw but without soaking. We will do this in batches and knead carefully to distribute them evenly without damaging the gluten mesh.
Make bulk fermentation.
- Grease with olive oil a bowl or recipient and put the dough inside. Cover and make a bulk proof for 3 hours and 30 minutes at room temperature. My home temperature was 85ºF. Turn and fold after 40 minutes two times.
- Let rise until almost double in sized.
- Set up a banneton and set aside. This time it will not be necessary to sprinkle with flour because the bread will be covered with seeds.
Shape the dough.
- Preshape into a boule (ball), be careful not to degas too much, and allow to bench rest for 15 minutes cover with a cotton cloth.
- Shape a batard, how I made this from Baltic Bake House again.
- Spray the outside of the bread with water and sprinkle the seeds. We will try to cover as much of the surface as possible with these.
- Place seam-side up in banneton, cover with a cotton cloth and put in the fridge for 17 hours.
SECOND DAY
Bake the loaf
- Preheat oven 445ºF* at least 30-40 minutes prior to baking with your stone or steel sheet on it positioned on final rack. Put inside a pan with volcanic stones, this helps to get steam in the baking.
- Transfer the bread from the banneton over a wooden board cover with parchment, seam side down. Score the bread.

- Place the bread into the oven and pour boiling water over the pan with volcanic stones. Close the oven door immediately to trap the moisture.
- Bake for 20 minutes at 410ºF.
- After first 20 minutes, open the oven door to allow steam goes out, remove the track with volcanic stones with kitchen gloves and reduce oven temperature to 390ºF. Bake for 10 minutes.
- Reduce temperature to 375ºC and bake 10 minutes more. Finally bake with convection at 375ºC for 10 minutes. Bread will get a better crust this way.
- Total bake time is 50 minutes.

Ending the bake...
- Once bake has ended, turn off the oven and let sit the bread inside the oven with the door ajar for 15 minutes. Remove from the oven and let cool over a rack.
PRESERVATION:
- Bread can be stored for up 3-4 days cover with cotton cloth. If the beginning is dry, cut the first slice and inside will be still tender.
- You can cut the bread into slices, cover with plastic film and freeze. This way is the better to make perfect toast each morning.
Notes
- Potato flakes must be natural, with no foreign additions such as milk or similar.
- Could I add mashed potatoes? Yes, of course. But the final hydration would vary slightly since the potato contains a part of water that you should take into account.
- The seeds can be a mixture of your choice. In my case I have used sunflower seeds, millet, poppy, golden and brown linseed.
- It is not necessary to sprinkle the banneton with flour, seeds will prevent the bread from sticking to it. Otherwise there would be remains of flour on the seeds and this is unpleasant.
- Scoring a seed-coated bread is not easy. For this reason, the ideal is not to complicate and make a simple cut.

This potato and seed sourdough bread is a real treat for the palate. Its flavor is wonderful, although this is not very complicated when it comes to homemade bread.
I hope that this example will help you to understand a little more about how the different types of flour and/or ingredients with which we make bake at home. But above all, so that you can make the most of it.
Big hugs,
Eva